Table of Contents
This short tutorial will guide you through the process of integrating a Java web application with the Authlete API.
AuthleticGear, a bricks-and-mortar retailer, runs a loyalty program for its customers. Program members can log in to the loyalty program website to view their points balance, transactions, and redeem points for a cash transfer to a linked bank account. The loyalty program website comprises a Java web application backend that exposes a RESTful API via Eclipse Jersey and an HTML5/JavaScript front end.
The company will soon be launching an e-commerce website. The requirement for this initial proof-of-concept is for existing loyalty program members to be able to link their loyalty account to the e-commerce site and view their points balance on the e-commerce front page. Later, the production system will allow customers to use loyalty points towards purchases.
Note that this is a ‘first party’ integration - the loyalty program and e-commerce site are both run by the same company. Typically, in this kind of use case, we skip the step of explicitly asking the user if the client can access their data at the service. We will, however, require that the user logs in when linking their account, even if they already have an active session at the loyalty program website, as a positive confirmation that they do wish to link their account.
The e-commerce team has already implemented an OAuth 2.0 Client. Your mission, as a developer on the loyalty program team, is to implement the OAuth 2.0 Authorization Server and Resource Server roles in the loyalty program web application.
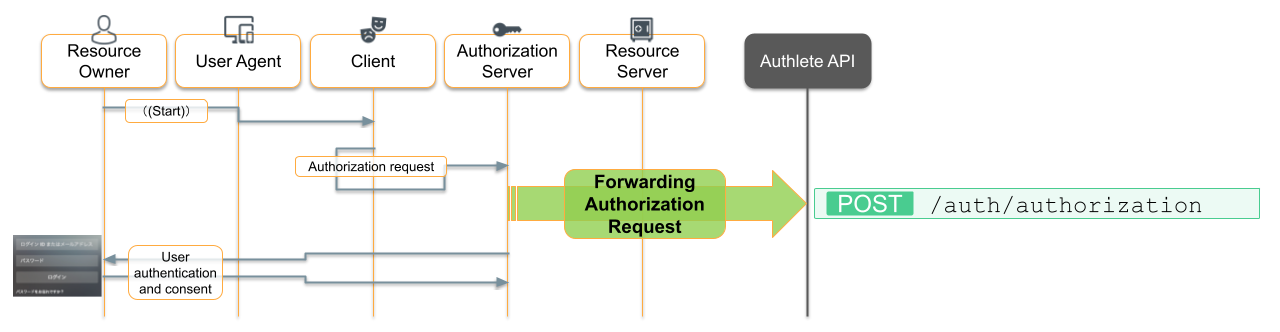
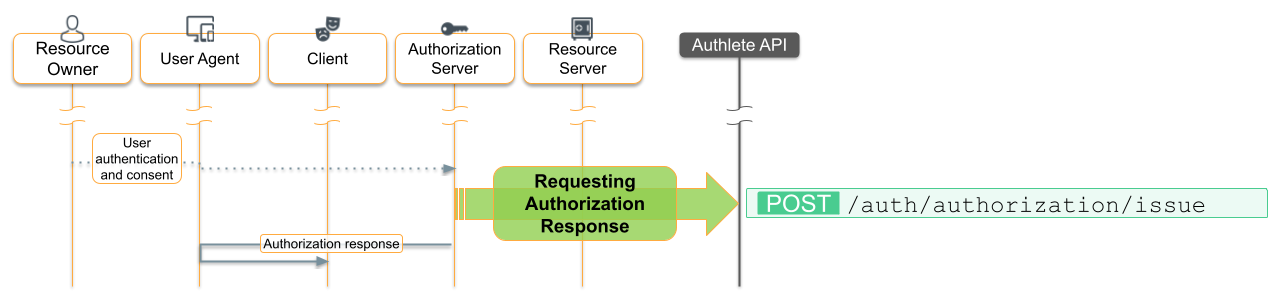
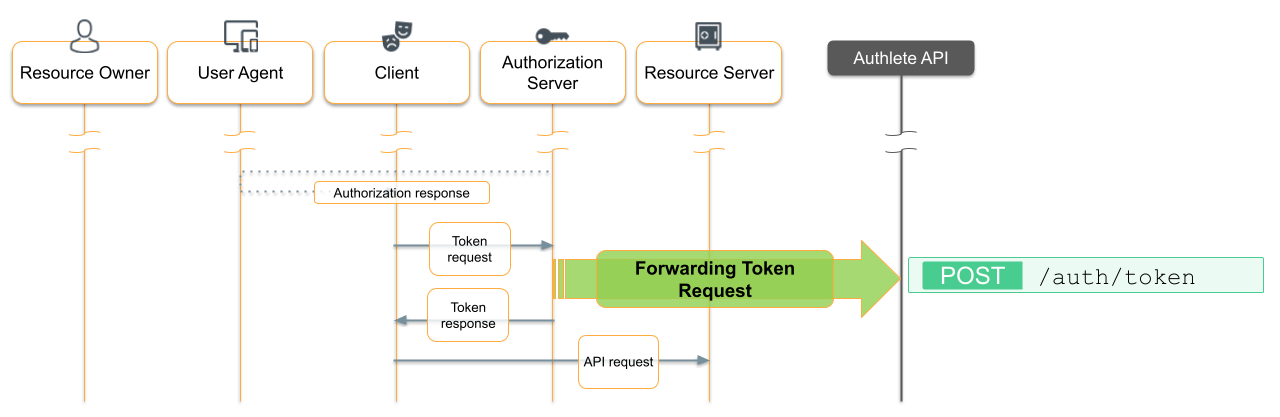
You understand the basics of OAuth 2.0, and the message flows between the customer’s browser (the ‘Resource Owner’s ‘User Agent’ in the diagram below), the e-commerce website (‘Client’) and the loyalty program website (‘Authorization Server’ and ‘Resource Server’):
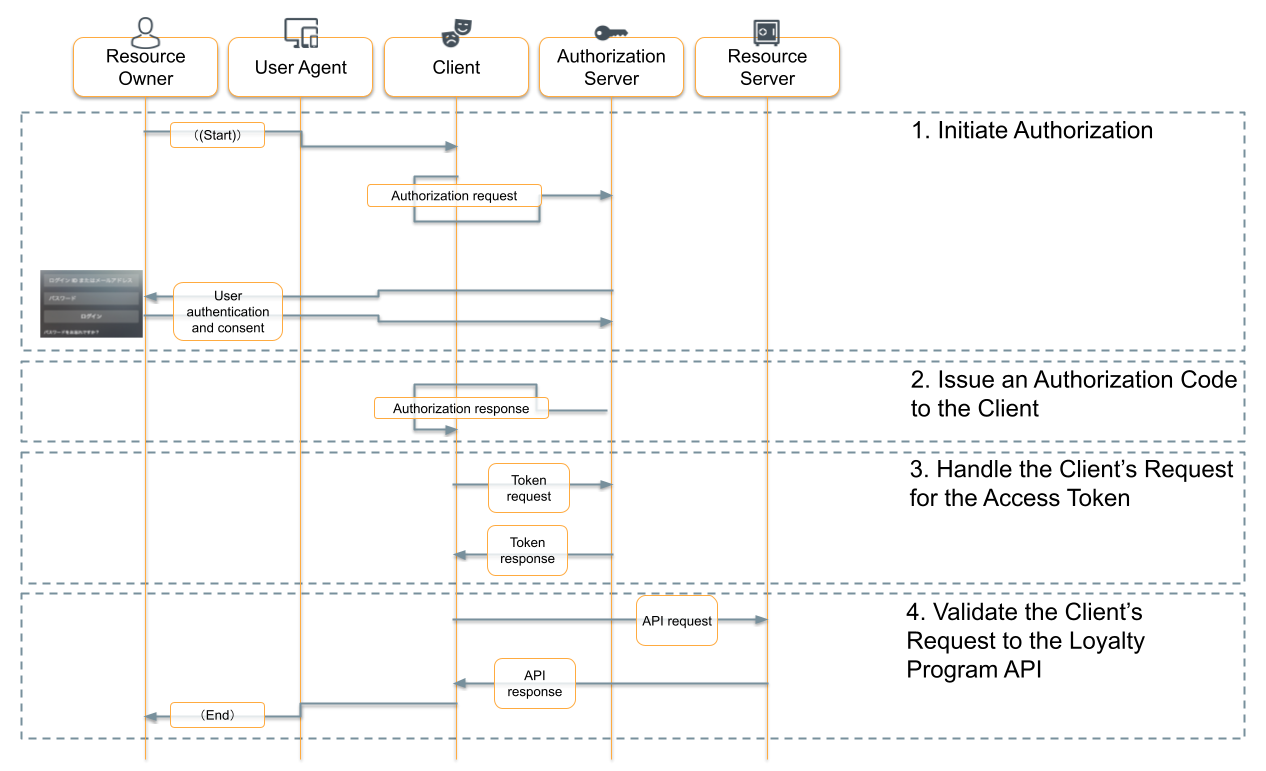
Note: the OAuth specifications, and the above diagram, differentiate between the Authorization Server, responsible for authenticating and authorizing users, and the Resource Server, responsible for handling API calls. Although the specification calls these out as two separate roles, a single application may fill both of them, as the loyalty program web app does in this tutorial.
It looks like a big job, but you have Authlete in your toolkit, so this will only take an hour or two!
You will need:
The demo system is implemented as a pair of Docker containers, each of which holds a Java EE web application, one for the e-commerce website and another for the loyalty site.
In step 3 of the above flow, the e-commerce OAuth client sends a request directly to the loyalty authorization server. We need to create a Docker network so that the e-commerce container can resolve the IP address of the loyalty container. Run the following command:
docker network create --driver bridge authlete-net
Start the e-commerce container with
docker run -d \
  --name authlete-ecommerce \
  --network authlete-net \
  --publish 8080:8080 \
  us-docker.pkg.dev/authlete/demo/java-getting-started-ecommerce:latest
You can modify the docker run arguments to suit your environment:
--publish 12345:8080 to select a different host port. If you do so, you will need to change 8080 to the port you chose throughout the tutorial.You can check the container logs to verify that the container started correctly and Tomcat is ready with:
docker logs authlete-ecommerce
You should see output ending with two lines similar to:
19-Mar-2022 22:24:15.466 INFO [main] org.apache.coyote.AbstractProtocol.start Starting ProtocolHandler ["http-nio-8080"]
19-Mar-2022 22:24:15.472 INFO [main] org.apache.catalina.startup.Catalina.start Server startup in [3463] milliseconds
If there are no errors reported, but you don’t see those lines at the end of the output, Tomcat is still starting up. Allow a few seconds and try again.
You can pause the Docker container if necessary with:
docker pause authlete-ecommerce
When you are ready to continue the tutorial:
docker resume authlete-ecommerce
The loyalty container exposes its source code in a local directory via a Docker bind mount. This means that you can edit the code on your machine (the Docker host) with your preferred source code editor or IDE.
You can create the source directory at any location on your machine. We’ll call this directory $SOURCE_ROOT in the tutorial.
Note that the source directory must exist before you can start the Docker container, and you must reference it in the --mount option when you start the loyalty container with docker run.
For example, to use /Users/jdoe/authlete_src as the source directory:
mkdir /Users/jdoe/authlete_src
docker run -d \
  --name authlete-loyalty \
  --network authlete-net \
  --publish 8081:8080 \
  --mount type=bind,source="/Users/jdoe/authlete_src",target=/mount \
  us-docker.pkg.dev/authlete/demo/java-getting-started-loyalty:latest
Once the container has started, if you examine the source directory with ls /Users/jdoe/authlete_src , the contents should include the loyalty subdirectory, containing the loyalty web application’s source code. The source directory includes a git repository, so you can easily checkout the code as it should be after each step of the tutorial if you need to.
Note that the loyalty container must listen on a different host port to the e-commerce container. In this tutorial, the e-commerce container will listen on port 8080 and the loyalty container on port 8081.
You can modify the docker run arguments as mentioned in the previous section to change the host port number.
Use the same commands as the e-commerce container to check the container logs, and to pause and resume the container, substituting the loyalty instance name, authlete-loyalty in place of the e-commerce instance name.
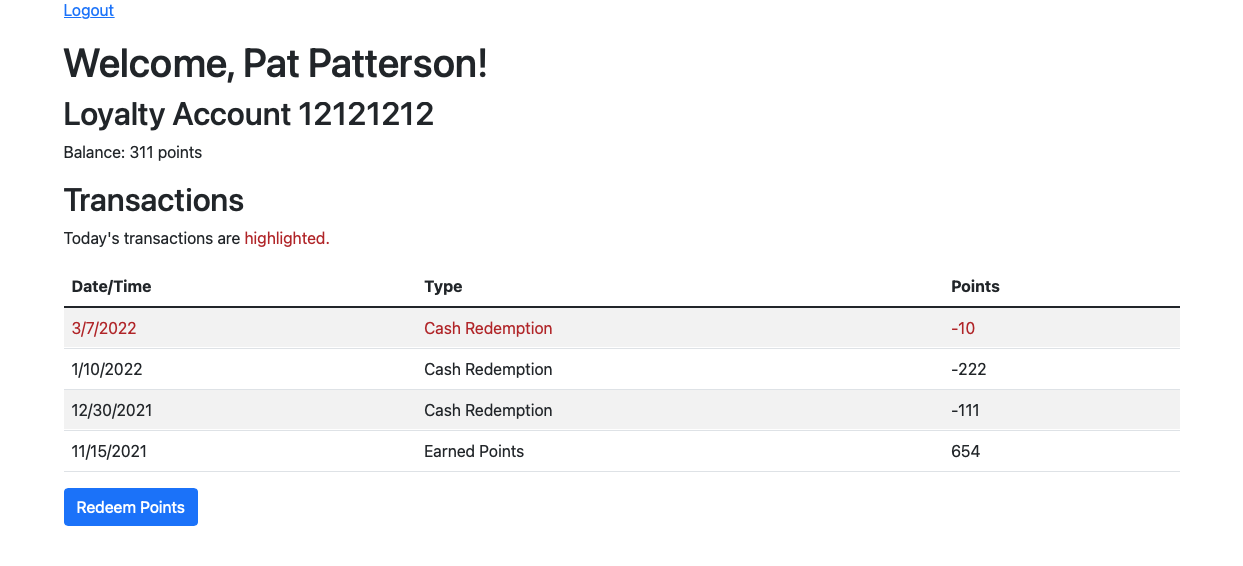
Browse to http://localhost:8081/loyalty/. You’ll see the home page for the loyalty program, with some placeholder text and a login link. Click the link and login with one of the sets of credentials shown on the page. You will see an account overview, with a list of transactions. The loyalty program web application uses an in-memory database which is loaded afresh with sample transactions each time the application is started. You can click ‘Redeem Points’ to simulate redeeming loyalty points for cash transferred to a linked bank account. This feature lets you easily change the account balance while the system is live, so you can check that the balance is being fetched dynamically.
The only other action you can take is to logout, which takes you back to the home page.
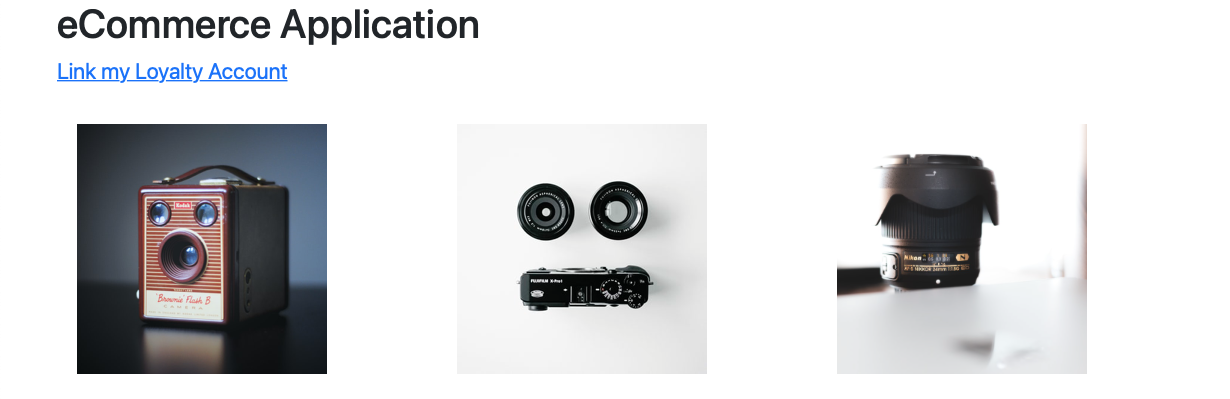
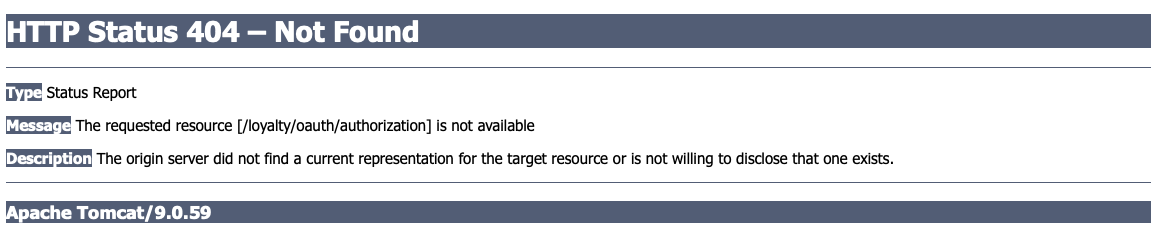
Open http://localhost:8080/ecommerce/ in your browser. This page is a simple mockup of a typical e-commerce website. The only functional element is the ‘Link my Loyalty account’ link. Click the link. If you are not already logged in to the loyalty site, you’ll be sent to the loyalty site to login. If you’re already logged in, or after you do so, you’ll see a 404 error for http://localhost:8081/loyalty/oauth/authorization, since the loyalty program does not yet support OAuth 2.0.
This tutorial contains everything you need to OAuth-enable the loyalty program web application, but feel free to examine the source code for the loyalty and e-commerce web applications at https://github.com/authlete/java-getting-started. Both are written in Java JDK 11 for Apache Tomcat 9.0.x. The following technologies are used in the apps:
The ecommerce team has implemented their OAuth Client and agreed on URLs for the loyalty authorization server, but it doesn’t yet exist. Let’s fix that!
Sign up for your Authlete account and click through to the Service Owner Console. You’ll see a default Authlete API Service instance.
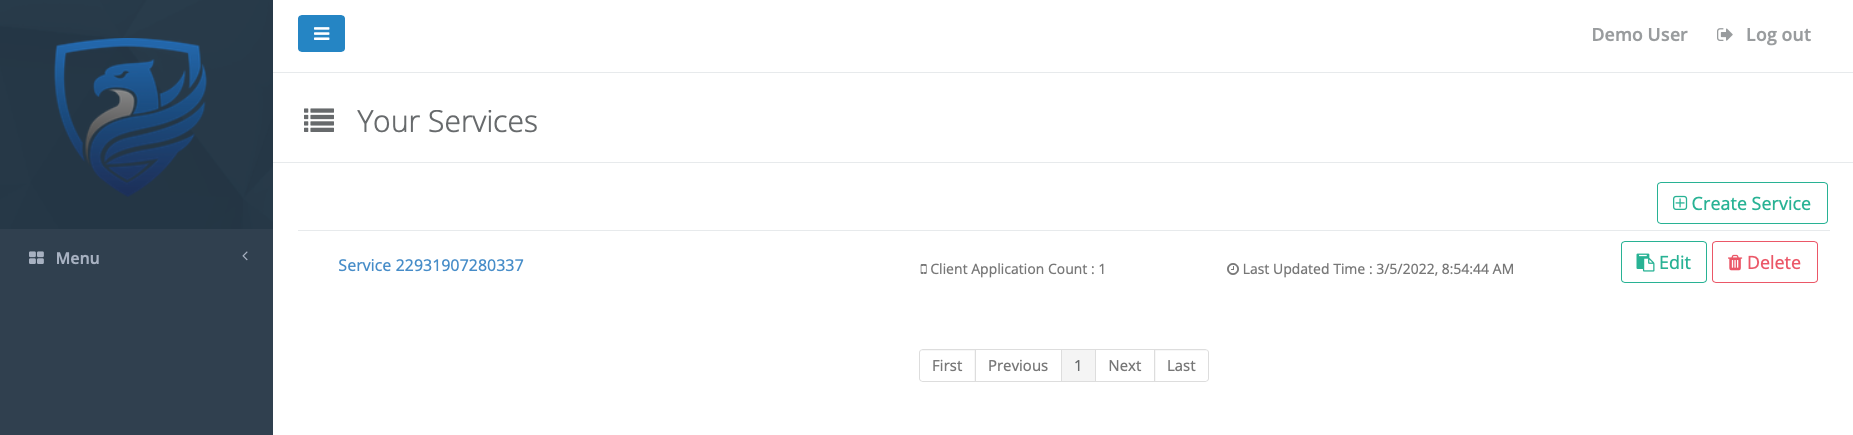
Click the Service to see its details.
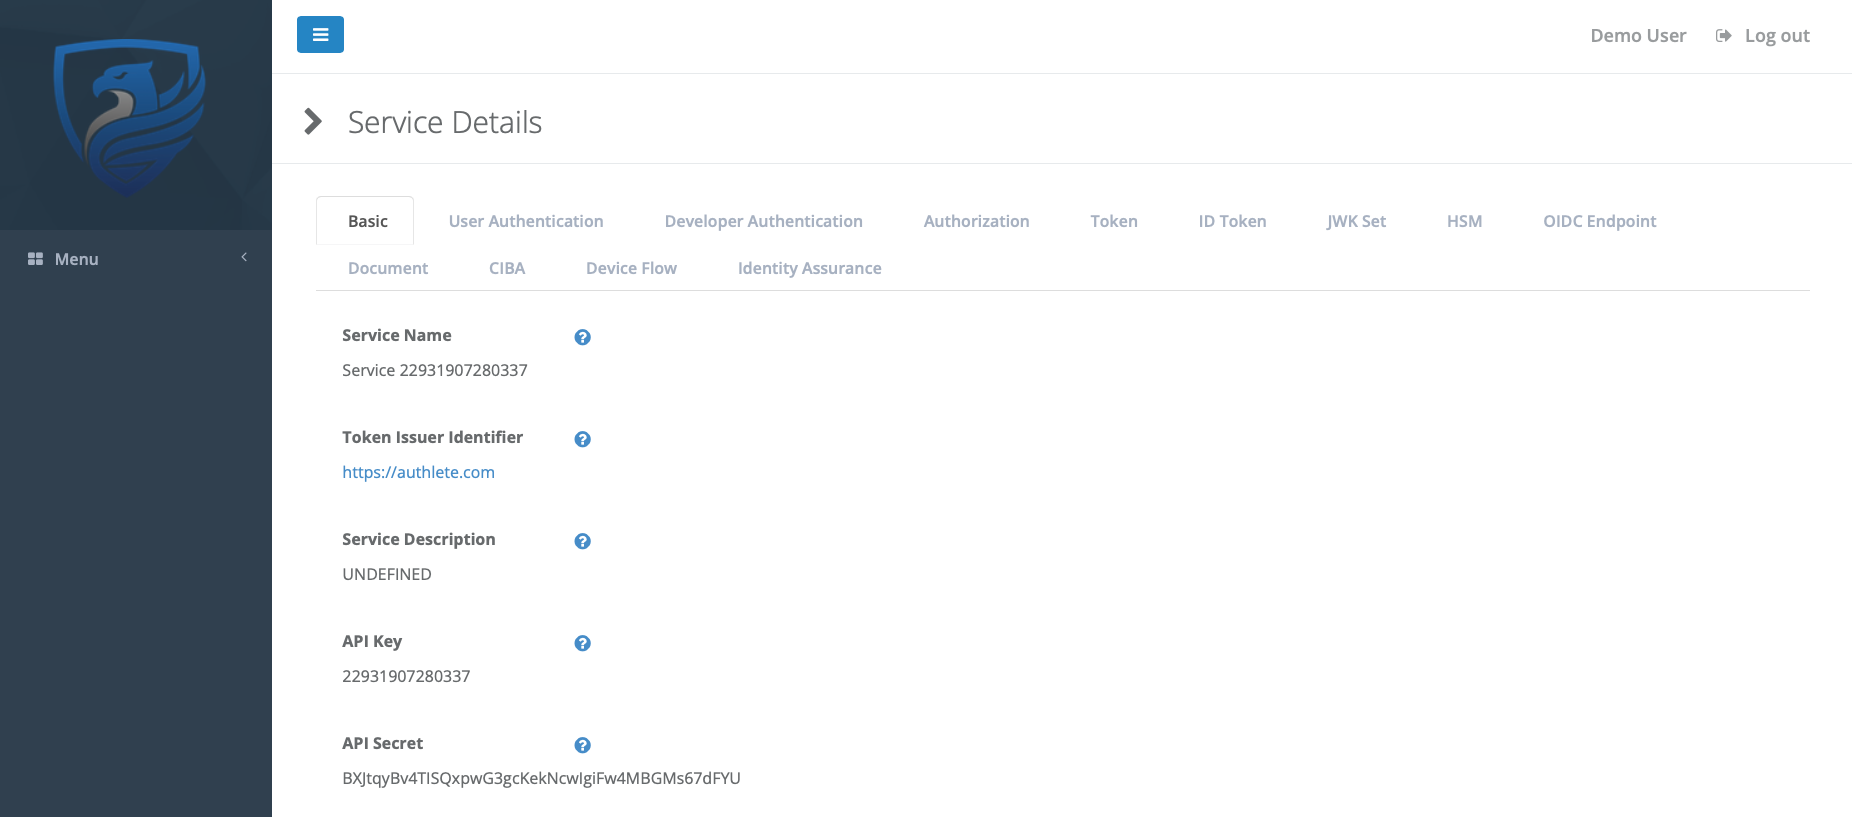
The loyalty program is the ‘Service’ from Authlete’s point of view, and this is where you manage its Authlete configuration.
Make a note of the API Key and API Secret - you’ll need those in the next step.
Scroll down, and you’ll see a link to the Client Application Developer Console.
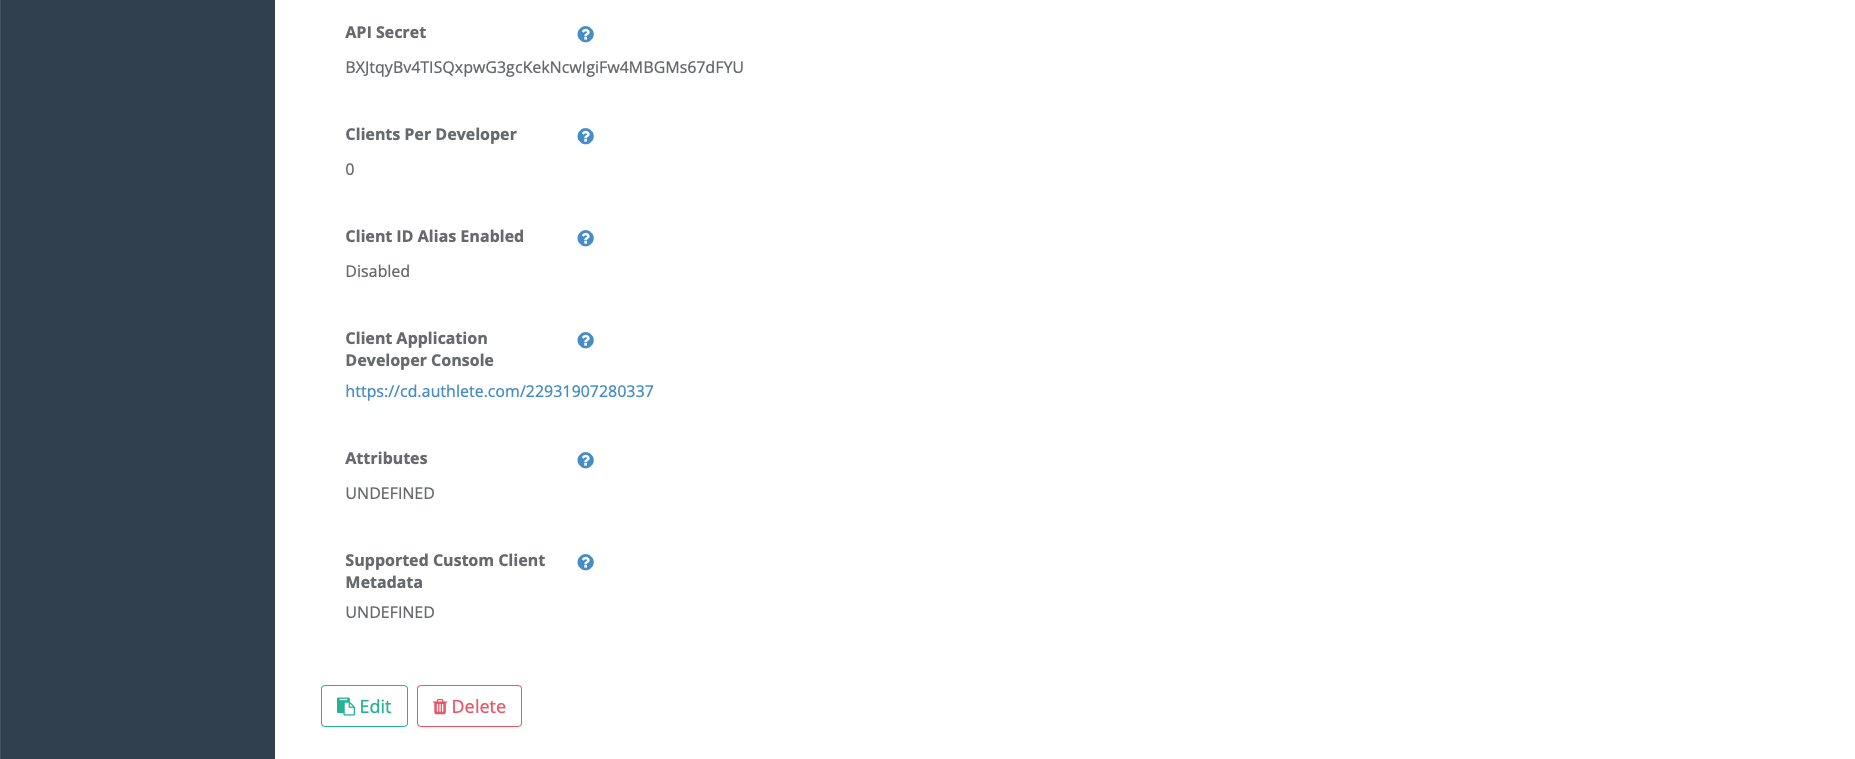
Click the link, and log in using your API Key as the login ID and your API Secret as the password.
If you do not see a default Client Application, then click Create App to create one. The Client Application will hold the OAuth 2.0 configuration for the e-commerce site:
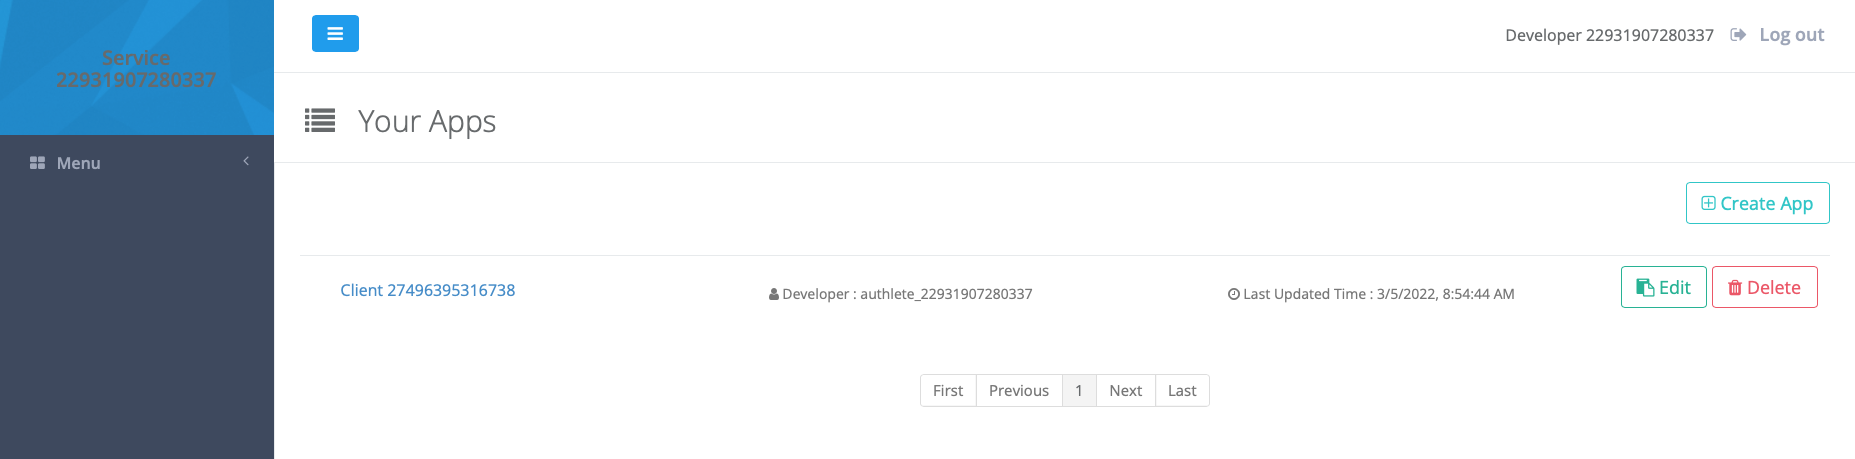
Click the Application to see its details.
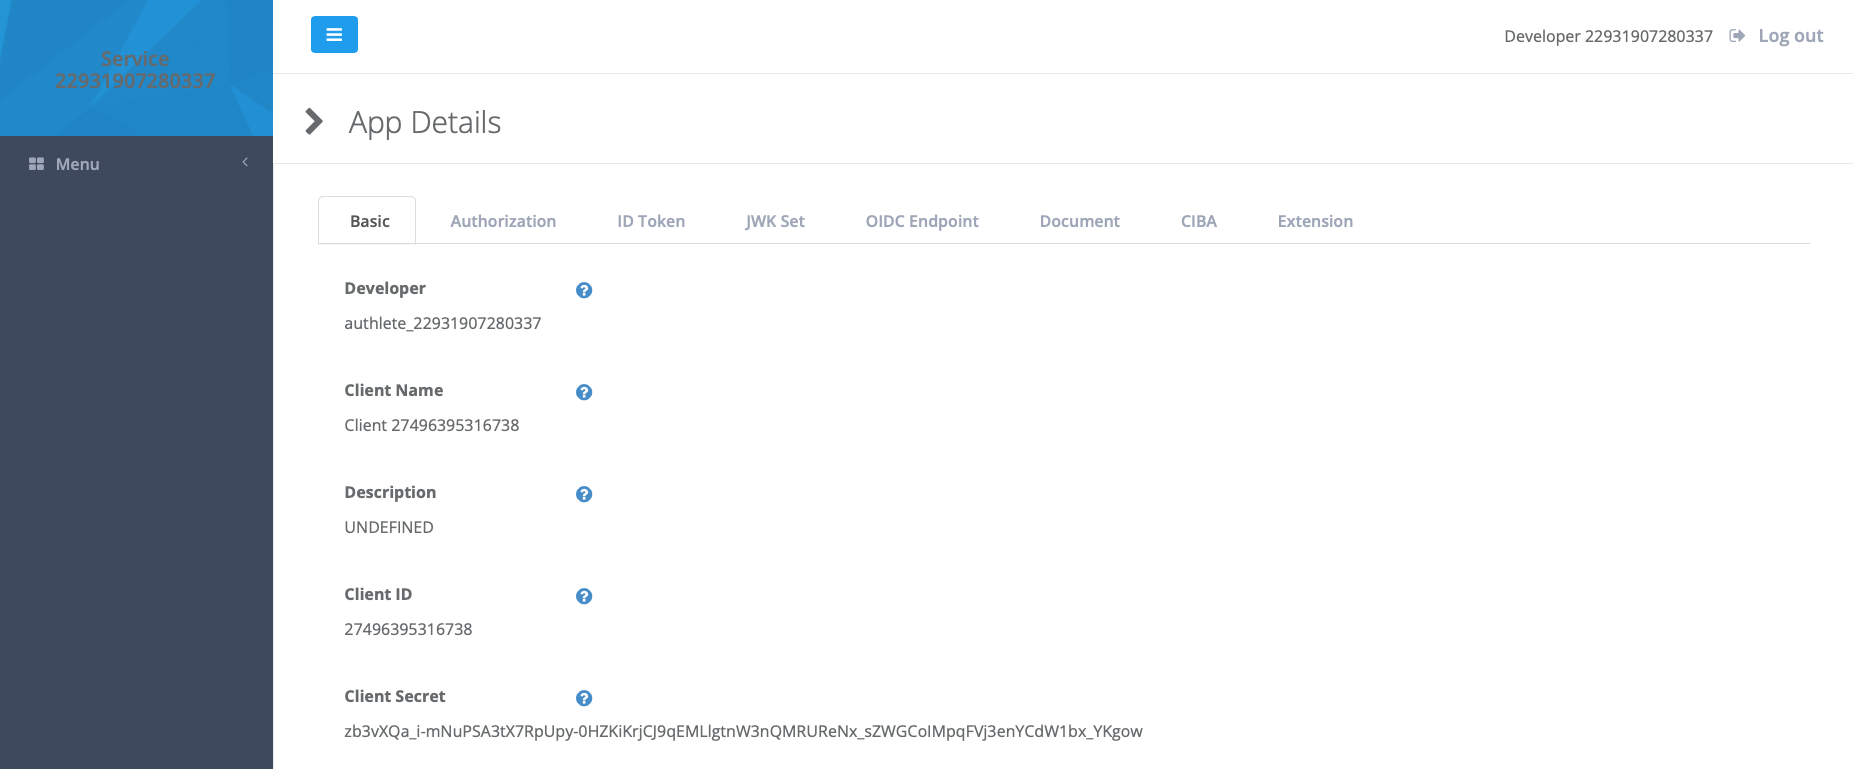
Make a note of the Client ID and Client Secret - you’ll need those as well.
Now you’ll make a few changes in the default Client configuration to tailor it to this scenario.
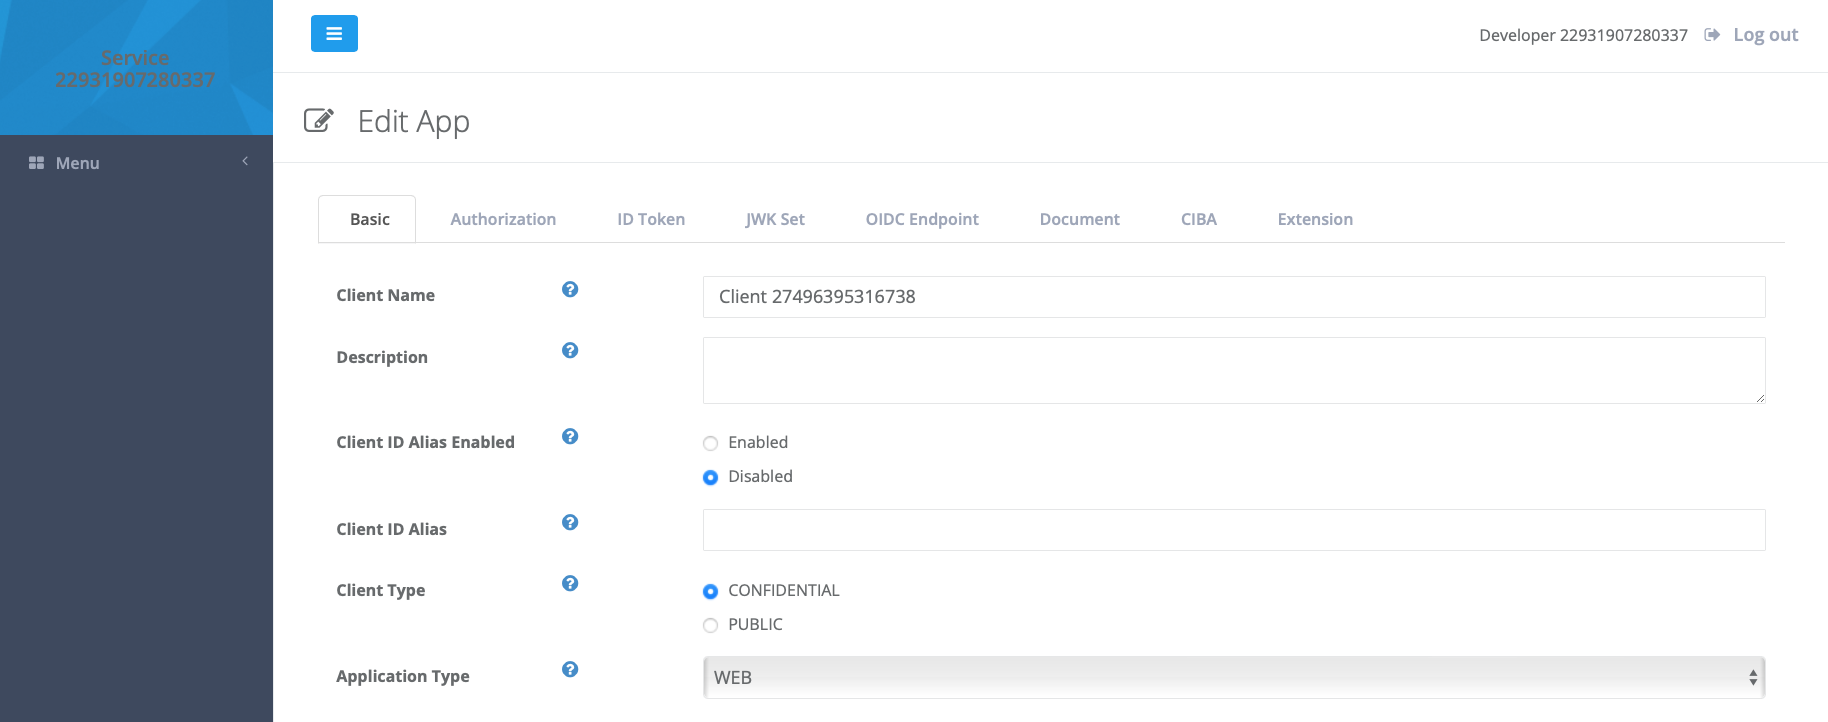
Scroll down to the bottom of the page and click Edit.
The e-commerce application is a web application capable of maintaining the confidentiality of its credentials (see Client Types for more detail) - they are stored securely on the server, so change Application Type to WEB and Client Type to CONFIDENTIAL:
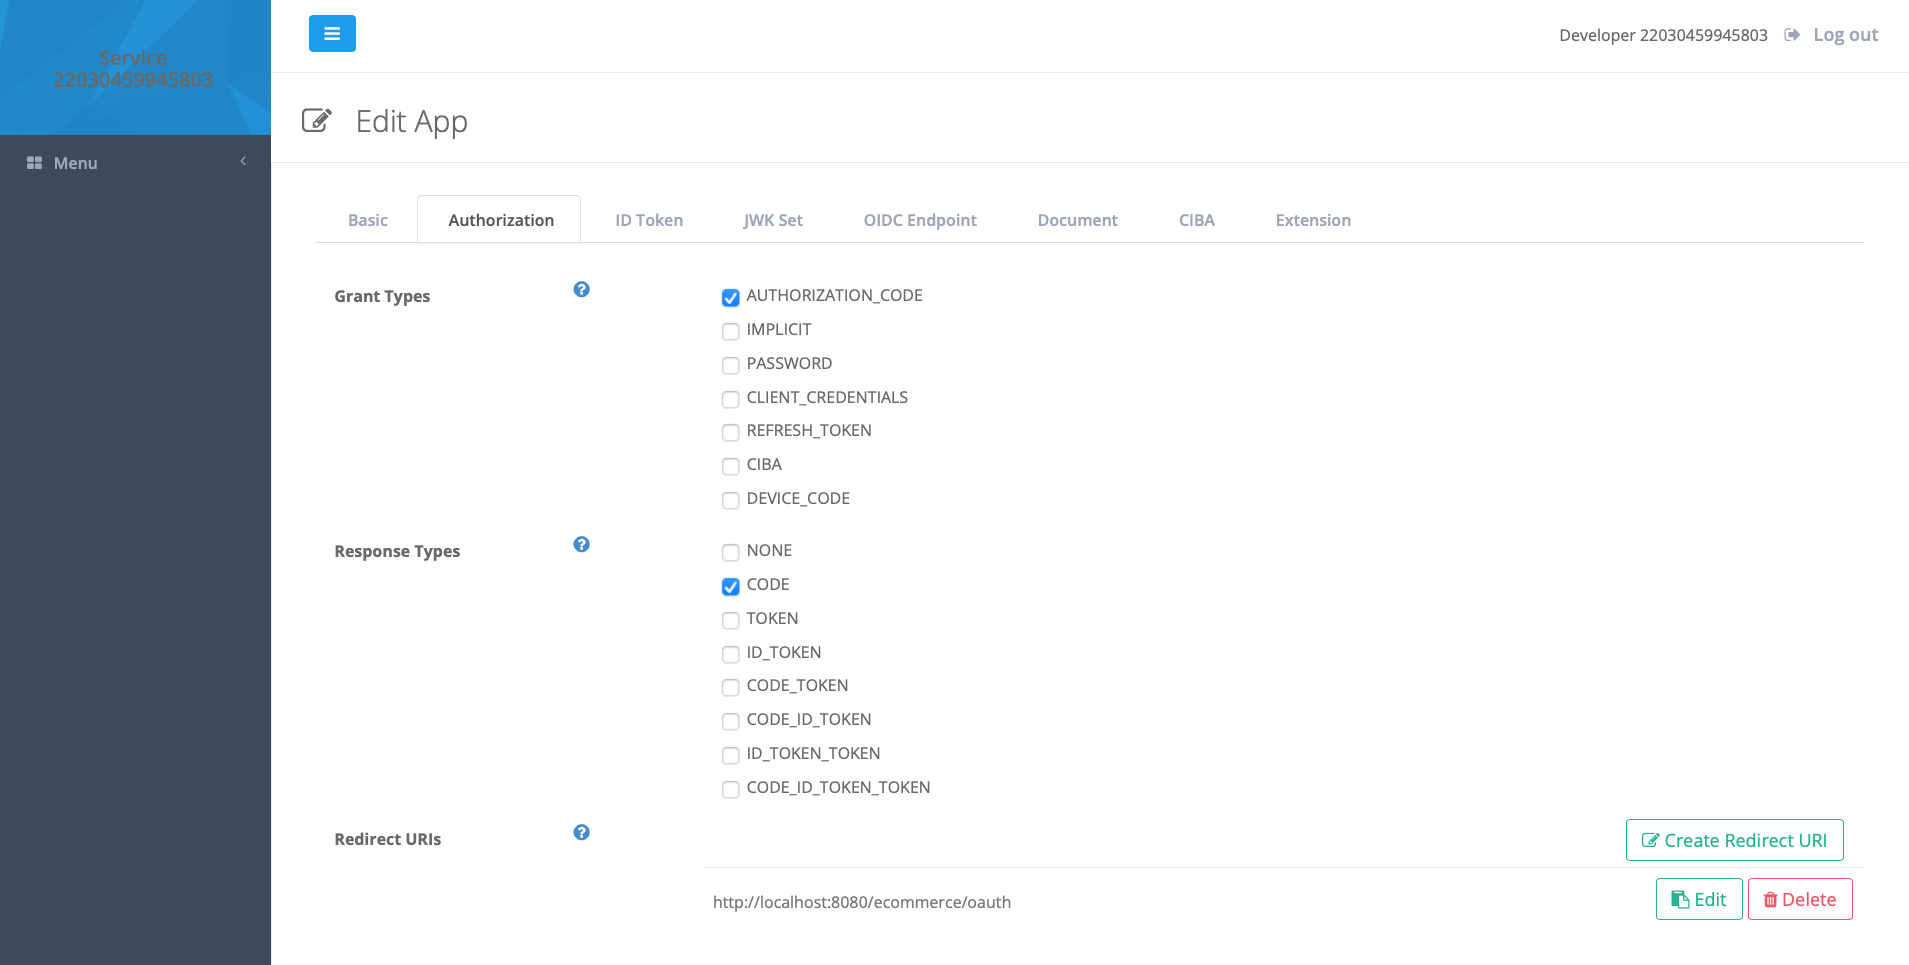
Now click the Authorization tab. In this scenario, the client is using the authorization code grant type, expecting a code parameter from the authorization server, so uncheck all of the Grant Types except AUTHORIZATION_CODE, and all of the Response Types except CODE.
Recall, in step 2 above, that, after authenticating the user, the Authorization Server redirects the user’s browser to the Client application. You need to add that redirect URI to the client configuration. Click Create Redirect URI, enter the client’s redirect URI:
http://localhost:8080/ecommerce/oauth
and click Create. Delete the mock redirect URI.
When retrieving an access token, the client expects to POST its credentials to the authorization server according to section 2.3 of RFC 6749, the OAuth 2.0 Authorization Framework (step 3 above). To configure this, scroll down to Token Endpoint and change Client Authentication Method to CLIENT_SECRET_POST. Scroll down to the bottom and click Update, then OK to save the configuration.
The e-commerce app reads its credentials from environment variables, so you will need to shutdown the e-commerce container and restart it, passing in the client ID and secret you noted earlier.
First, stop and remove the e-commerce container:
docker stop authlete-ecommerce
docker rm authlete-ecommerce
Now, run it again, setting the CLIENT_ID and CLIENT_SECRET environment variables on the command line:
docker run -d \
  --name authlete-ecommerce \
  --network authlete-net \
  --publish 8080:8080 \
  --env CLIENT_ID="your_client_id" \
  --env CLIENT_SECRET="your_client_secret" \
  us-docker.pkg.dev/authlete/demo/java-getting-started-ecommerce:latest
Note: if you are running the applications with host ports other than the default 8080 and 8081, you will also need to update the e-commerce application’s configuration file. Create a file on your machine named
oauthService.jsonwith the following content: \{ "service_name": "Loyalty", "auth_uri": "http://localhost:8081/loyalty/oauth/authorization", "redirect_uri": "http://localhost:8080/ecommerce/oauth", "token_uri": "http://authlete-loyalty:8080/loyalty/oauth/token", "api_endpoint": "http://authlete-loyalty:8080/loyalty/api/currentCustomer", "query_params": { "prompt": "login" }, }The
auth_uriandredirect_uriendpoints are accessed by the browser running on your local machine (the Docker host). Change the port numbers in those two URLs to the host ports you are using for the loyalty container and ecommerce container respectively.Do not change the port number in
token_uriorapi_endpoint- the e-commerce application accesses these endpoints directly via the Docker network.Copy
oauthService.jsoninto the e-commerce app’s container:docker cp oauthService.json authlete-ecommerce:/src/ecommerce/src/main/webapp/WEB-INF/oauthService.jsonFinally, rebuild the e-commerce app:
docker exec -it authlete-ecommerce /run/rebuild.sh
The e-commerce app now has everything it needs as an OAuth 2.0 client. It’s time to focus on the loyalty app.
Create a file, named authleteCredential.json, in $SOURCE_ROOT/loyalty/src/main/webapp/WEB-INF with the service owner credentials (API key and secret) you noted earlier:
{
  "api_key" : "<your api key>",
  "api_secret" : "<your api secret>"
}
Note that each credential must be enclosed in double quotes - these are part of the JSON file format.
Now it’s time to get coding!
In this step, you’ll create a servlet at http://localhost:8081/loyalty/oauth/authorization to process the incoming authorization request.
The servlet will simply forward the incoming authorization request to the Authlete Authorization API, and then act according to the response, returning a redirect to the login page.
As mentioned above, the source directory includes a git repository. Verify that the repository is in the correct starting state by running:
git status
You should see the following output:
On branch main
Your branch is up to date with 'origin/main'.

nothing to commit, working tree clean
If the repository is not on the main branch, run the following command to checkout the correct branch:
git checkout main
Create a new directory, oauth, in $SOURCE_ROOT/loyalty/src/main/java/com/authlete/simpleauth, then create a new Java source file, OAuthAuthorizationServlet.java, with this content:
package com.authlete.simpleauth.oauth;

import com.authlete.simpleauth.LoginUtils;
import com.authlete.simpleauth.UserAccount;
import com.fasterxml.jackson.databind.ObjectMapper;
import org.apache.logging.log4j.LogManager;
import org.apache.logging.log4j.Logger;
import org.glassfish.jersey.client.authentication.HttpAuthenticationFeature;

import javax.servlet.annotation.WebServlet;
import javax.servlet.http.HttpServlet;
import javax.servlet.http.HttpServletRequest;
import javax.servlet.http.HttpServletResponse;
import javax.ws.rs.client.Client;
import javax.ws.rs.client.Entity;
import javax.ws.rs.core.GenericType;
import javax.ws.rs.core.MediaType;
import java.io.IOException;
import java.util.Collections;
import java.util.HashMap;
import java.util.List;
import java.util.Map;

@WebServlet("/oauth/authorization")
public class OAuthAuthorizationServlet extends HttpServlet {
    private static final Logger logger = LogManager.getLogger();
    private static final long serialVersionUID = 1L;
    private final ObjectMapper mapper = new ObjectMapper();

    @Override
    protected void doGet(HttpServletRequest request, HttpServletResponse response) throws IOException {
    }
}
The loyalty web application uses a servlet filter to redirect HTTP requests to the login page. The isPublicPage() method in the LoginUtils class determines which resources can be returned without requiring a user login. You must add the path to the OAuth servlet to its list of resources so that the servlet can control the login process.
Open $SOURCE_ROOT/loyalty/src/main/java/com/authlete/simpleauth/LoginUtils.java and replace the isPublicPage() method with the following code:
  public static boolean isPublicPage(HttpServletRequest request) {
    String requestUri = request.getRequestURI();
    String contextPath = request.getContextPath();

    // The login page, front page and CSS path are public
    return requestUri.equals(contextPath + "/login") ||
            requestUri.equals(contextPath + "/index.html") ||
            requestUri.equals(contextPath + "/") ||
            requestUri.startsWith(contextPath + "/css") ||
            requestUri.startsWith(contextPath + "/oauth/");
  }
Return to the OAuthAuthorizationServlet.java file you created and add the following code as the body of the doGet() method:
initiateAuthleteAuthorization(request, response);
Now add the following code to define that initiateAuthleteAuthorization() method in the same class:
    private void initiateAuthleteAuthorization(HttpServletRequest request, HttpServletResponse response) throws IOException {
        // 1. Get a Jersey HTTP client
        Client client = OAuthUtils.getClient(getServletContext());

        // 2. We will wrap the incoming query string in a JSON object
        Map<String, Object> requestMap = Collections.singletonMap("parameters", request.getQueryString());

        // 3. Call the Authlete Authorization endpoint
        String url = "https://api.authlete.com/api/auth/authorization";

        logger.info("Sending API request to {}:\n{}", url, OAuthUtils.prettyPrint(requestMap));

        // 4. Make the API call, parsing the JSON response into a map
        Map<String, Object> authApiResponse = client.target(url)
                .request()
                .post(Entity.entity(requestMap, MediaType.APPLICATION_JSON_TYPE), new GenericType<>() {
                });

        logger.info("Received API response:\n{}", OAuthUtils.prettyPrint(authApiResponse));

        // 5. 'action' tells us what to do next, 'responseContent' is the payload we'll return
        String action = (String) authApiResponse.get("action");
        String responseContent = (String) authApiResponse.get("responseContent");

        // 6. Perform the action
        switch (action) {
            case "INTERACTION":
                List<Object> prompts = (List<Object>) authApiResponse.get("prompts");
                for (Object prompt : prompts) {
                    if (prompt.equals("LOGIN")) {
                        // 7. Prompt the user to login
                        request.getSession().setAttribute("authApiResponse", authApiResponse);
                        LoginUtils.redirectForLogin(request, response);
                        return;
                    }
                }
                break;

            // 8. Handle errors
            case "INTERNAL_SERVER_ERROR":
                OAuthUtils.setResponseBody(response, HttpServletResponse.SC_INTERNAL_SERVER_ERROR, responseContent);
                return;

            case "BAD_REQUEST":
                OAuthUtils.setResponseBody(response, HttpServletResponse.SC_BAD_REQUEST, responseContent);
                return;
        }

        // 9. We should never get here!
        Map<String, String> errorResponse = Map.of(
            "error", "unexpected_error",
            "error_description", "Contact the service owner for details"
        );
        OAuthUtils.setResponseBody(response, HttpServletResponse.SC_INTERNAL_SERVER_ERROR, mapper.writeValueAsString(errorResponse));
    }
Note - if you are using an IDE, it will likely show an error regarding the OAuthUtils class not being defined. We’ll add that class in a moment.
It looks like there’s a lot going on, but the process is actually quite straightforward. Following the comments in the method:
The servlet will be interacting with the Authlete API via HTTP, so we get a Jersey HTTP client.
Note: There is an Authlete Java SDK we could use, but this tutorial shows how to interact directly with the Authlete API so you get a clear understanding of the message flow.
The Authlete API is expecting a JSON payload with the incoming query string in the parameters property, like this:
{
  "parameters": "response_type=code&client_id=..."
}
Since we’re building a quick proof-of-concept, we create a Map with the required structure, rather than generating Java classes corresponding to the JSON structures.
We are calling the Authlete Authorization endpoint at /auth/authorization to continue the OAuth flow.
The servlet makes the API call, parsing the response into another Java Map.
The response’s action property indicates what the servlet should do next, and responseContent holds data that the servlet will relay back to the client.
OAuth is a very flexible protocol, and there are many possible actions that the service might need to take at this point, depending on the use case and service configuration. Click ‘Description’ in the Authlete Authorization endpoint documentation to see all of the possibilities.
The main one we are concerned with right now is INTERACTION - this indicates that some kind of interaction with the user is required. Thinking back to the use case, at this point, the user should be prompted to login, regardless of whether they already have an active session at the loyalty program website. The code here handles that case by checking that there is a prompts property in the API response that contains a single LOGIN entry.
If there is no prompts property, or it contains anything other than a single LOGIN entry, execution will flow to the error handler at the end of the method (9).
The API response is saved in the session for later processing and the user is redirected to login. After logging in, the user will be redirected back to this servlet.
The Authlete API may indicate errors via the action property, and the servlet must handle them accordingly. Notice that, in these cases, responseContent holds the payload for the error response.
If action is not one of the expected values, or there was some other error, then a generic error is returned.
You might have noticed that the servlet references a couple of utility classes. Create OAuthUtils.java in the $SOURCE_ROOT/loyalty/src/main/java/com/authlete/simpleauth/oauth directory with the following content:
package com.authlete.simpleauth.oauth;

import com.fasterxml.jackson.core.JsonProcessingException;
import com.fasterxml.jackson.databind.ObjectMapper;
import com.fasterxml.jackson.databind.SerializationFeature;
import org.apache.logging.log4j.LogManager;
import org.apache.logging.log4j.Logger;
import org.glassfish.jersey.client.ClientConfig;
import org.glassfish.jersey.client.authentication.HttpAuthenticationFeature;

import javax.servlet.ServletContext;
import javax.servlet.http.HttpServletResponse;
import javax.ws.rs.client.Client;
import javax.ws.rs.client.ClientBuilder;
import javax.ws.rs.client.Entity;
import javax.ws.rs.core.GenericType;
import javax.ws.rs.core.MediaType;
import java.io.FileNotFoundException;
import java.io.IOException;
import java.io.InputStream;
import java.util.Map;

public class OAuthUtils {
   private static final String AUTHLETE_CREDENTIAL_JSON = "/WEB-INF/authleteCredential.json";
   private static final ObjectMapper mapper = new ObjectMapper().enable(SerializationFeature.INDENT_OUTPUT);

   private static AuthleteCredential getAuthleteCredential(ServletContext context) throws IOException {
       ObjectMapper mapper = new ObjectMapper();
       InputStream inputStream = context.getResourceAsStream(AUTHLETE_CREDENTIAL_JSON);
       if (inputStream == null) {
           throw new FileNotFoundException(AUTHLETE_CREDENTIAL_JSON);
       }
       return mapper.readValue(inputStream, AuthleteCredential.class);
   }

   public static synchronized Client getClient(ServletContext context) throws IOException {
       Client client = (Client)context.getAttribute("authleteClient");
       if (client == null) {
           AuthleteCredential authleteCredential = getAuthleteCredential(context);
           client = ClientBuilder.newClient(new ClientConfig())
                   .register(HttpAuthenticationFeature.basic(authleteCredential.getApiKey(), authleteCredential.getApiSecret()));
           context.setAttribute("authleteClient", client);
       }

       return client;
   }

   static void setResponseBody(HttpServletResponse response, int statusCode, String responseContent) throws IOException {
       response.setStatus(statusCode);
       response.setContentType(MediaType.APPLICATION_JSON);
       response.setHeader("Cache-Control", "no-store");
       response.setHeader("Pragma", "no-cache");
       response.getWriter().print(responseContent);
   }

   public static String prettyPrint(Map<String, Object> requestMap) {
       try {
           return mapper.writeValueAsString(requestMap);
       } catch (JsonProcessingException e) {
           return null;
       }
   }
}
Looking at OAuthUtils.java:
getAuthleteCredential() loads the Authlete API key and secret from the JSON file you created earlier.getClient(), the first time it runs, creates an HTTP client that authenticates to the Authlete API via HTTP Basic authentication using the Authlete API key and secret. The client is saved in the servlet context for future use.setResponseBody() populates an HttpServletResponse object with a status code and JSON content.prettyPrint() renders a Java Map as indented JSON.Create AuthleteCredential.java in the same directory with the following content:
package com.authlete.simpleauth.oauth;

import com.fasterxml.jackson.annotation.JsonProperty;

public class AuthleteCredential {
  @JsonProperty("api_key")
  private String apiKey;

  @JsonProperty("api_secret")
  private String apiSecret;

  @JsonProperty("api_key")
  public String getApiKey() {
    return apiKey;
  }

  @JsonProperty("api_key")
  public void setApiKey(String apiKey) {
    this.apiKey = apiKey;
  }

  @JsonProperty("api_secret")
  public String getApiSecret() {
    return apiSecret;
  }

  @JsonProperty("api_secret")
  public void setApiSecret(String apiSecret) {
    this.apiSecret = apiSecret;
  }
}
If you were to rebuild and run the app right now, you’d find that, after clicking ‘Link my Loyalty Account’ at the e-commerce site and logging in, you’d be prompted to log in again, and again, and again. Recall that the servlet saves the Authlete API response in the HTTP session. We need to check for its presence so that we can take the next step.
Back in OAuthAuthorizationServlet.java, replace the doGet() function with the code below.
    @Override
    protected void doGet(HttpServletRequest request, HttpServletResponse response) throws IOException {
        Map<String, Object> authApiResponse = (Map<String, Object>) request.getSession().getAttribute("authApiResponse");
        request.getSession().removeAttribute("authApiResponse");
        logger.info("{} API response in the session", authApiResponse == null ? "No" : "Found an");
        if (authApiResponse == null) {
            initiateAuthleteAuthorization(request, response);
        } else {
            processAuthleteAuthorization(request, response, authApiResponse);
        }
    }
Now the servlet will try to retrieve an API response from the session, and only initiate the authentication process if it doesn’t find one. Otherwise, it moves to the next step of the flow.
Finally, add a stub for that next step to the OAuthAuthorizationServlet class:
    private void processAuthleteAuthorization(HttpServletRequest request, HttpServletResponse response, Map<String, Object> authApiResponse) throws IOException {
        // Not yet implemented!
        Map<String, String> errorResponse = Map.of(
            "error", "not_yet_implemented",
            "error_description", "This step is not yet implemented"
        );
        OAuthUtils.setResponseBody(response, HttpServletResponse.SC_NOT_IMPLEMENTED, mapper.writeValueAsString(errorResponse));
    }
Now we get to see our hard work in action!
The Docker container includes a script to rebuild the applications and redeploy them into Tomcat. Save all your changes and run the script in a terminal:
docker exec -it authlete-loyalty /run/rebuild.sh
You’ll see the build output scroll past. If you have an error in your code, the build will halt and indicate the location of the error, for example:
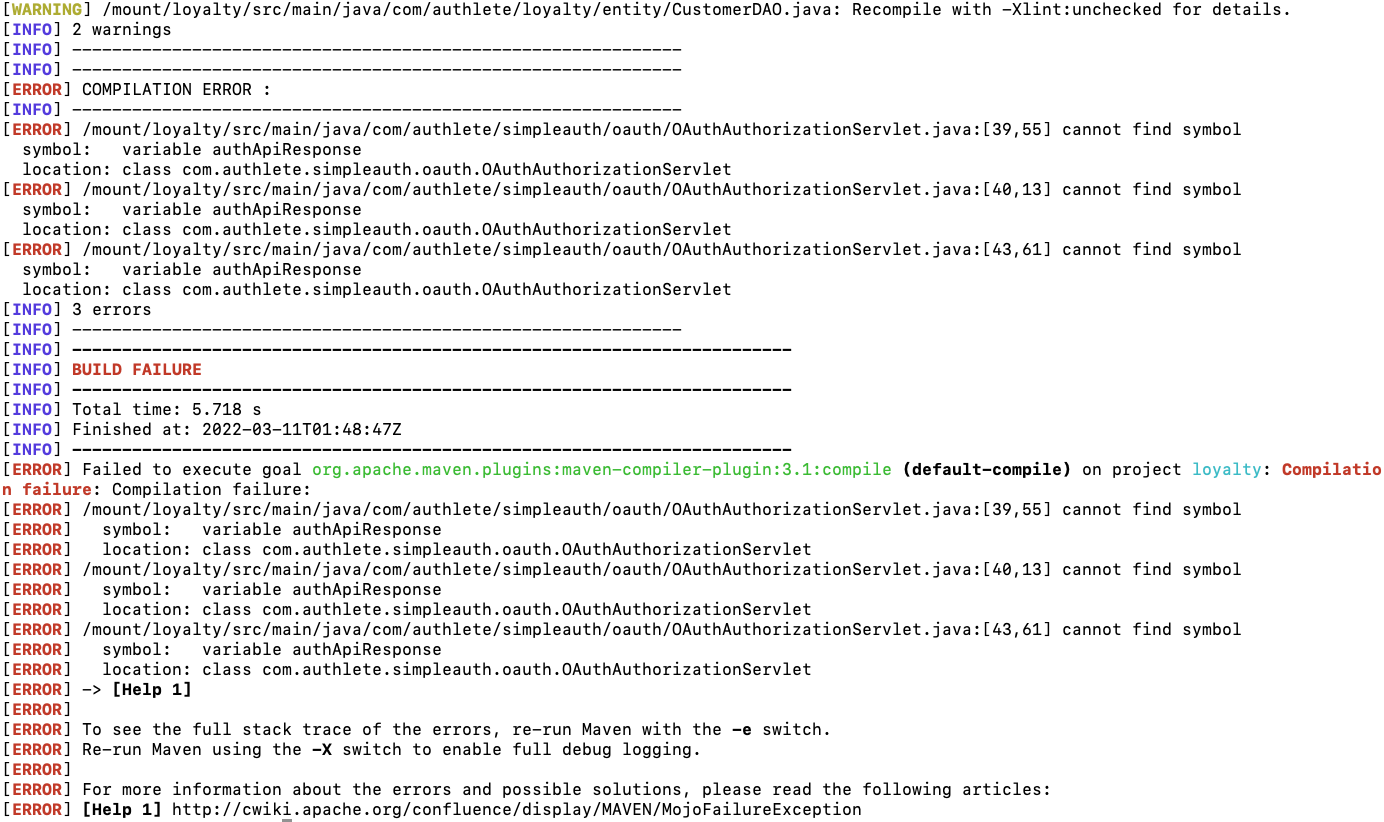
Use the build output to locate the issue, correct it, and retry the build.
If all is well, you should see a successful build:
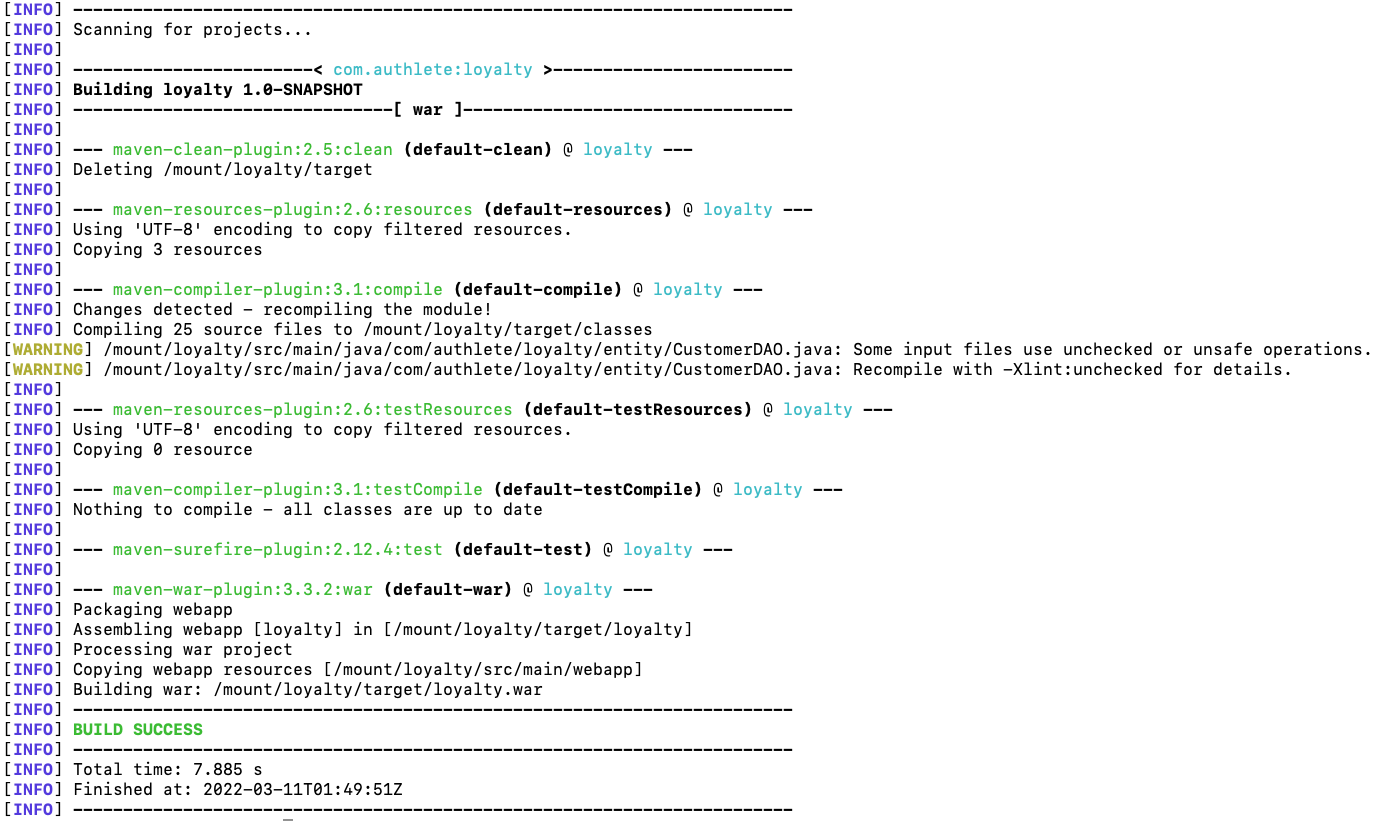
Browse to http://localhost:8080/ecommerce and click ‘Link my Loyalty Account’. You should be prompted to login. Once you’ve logged in, rather than the earlier 404 error, you’ll see the ‘not yet implemented’ error that you just added:
{"error": "not_yet_implemented", "error_description": "This step is not yet implemented"}
We did a lot in this step, but most of it was laying the foundation for the remainder of the OAuth flow. Let’s move on!
If you run into any issues, you can discard your changes so that the source is in its original state, or checkout the source as it should be at the end of step 1.
To discard your changes:
git restore .
To discard your changes and skip to the end of step 1:
git restore .
git checkout step-1
Looking back to the flow diagram, we’ve implemented step 1 of the OAuth 2.0 flow. Now the e-commerce app is expecting the loyalty program app to redirect the user’s browser back, with an OAuth 2.0 authorization code as a query parameter.
Our next task, then, is to make another Authlete API call, to obtain that authorization code, implementing step 2.
Replace the stub implementation of the processAuthleteAuthorization() method in OAuthAuthorizationServlet.java with the following:
    private void processAuthleteAuthorization(HttpServletRequest request, HttpServletResponse response, Map<String, Object> authApiResponse) throws IOException {
        // 1. Create a Map to send in the Authlete API request
        Map<String, Object> requestMap = new HashMap<>();

        // 2. Copy the ticket from the last API response into the map
        requestMap.put("ticket", authApiResponse.get("ticket"));

        // 3. Verify that the user is actually logged in
        UserAccount authenticatedUser = LoginUtils.getAuthenticatedUser(request.getSession());
        if (authenticatedUser == null) {
            requestMap.put("reason", "NOT_LOGGED_IN");
            OAuthUtils.handleAuthleteApiCall(getServletContext(), response, "/auth/authorization/fail", requestMap);
            return;
        }

        // 4. Issue the code
        requestMap.put("subject", authenticatedUser.getUsername());
        OAuthUtils.handleAuthleteApiCall(getServletContext(), response, "/auth/authorization/issue", requestMap);
    }
Walking through the method:
We create a map to send as the Authlete API request.
Each authorization with Authlete is identified by a unique ticket value returned by the first call to the Authlete API. The service must include this in subsequent messages.
We verify that the user has actually logged in successfully. Notice the call to the /auth/authorization/fail endpoint to signal the failure if they have not. We’ll cover the OAuthUtils.handleAuthleteApiCall() method in a moment.
We add the authenticated user’s username to the request map as the subject entry and call the Authlete /auth/authorization/issue endpoint.
Depending on the use case, the servlet might perform much more processing here. For example, in this single-party proof-of-concept, the client does not pass a scope parameter in its request. In a third-party OAuth interaction, the client typically passes a list of permissions in the scope parameter and the servlet prompts the end user for their consent to the client receiving those permissions.
If you look at the documentation for /auth/authorization/issue, you’ll notice that, although it is performing a different operation, it behaves in a very similar way to the /auth/authorization endpoint. It returns a JSON object with an action and responseContent, with a similar set of possible values for action as before. This time, the servlet is expecting the LOCATION action, instructing it to return HTTP status 302 Found to the client, redirecting it to the location held in responseContent, which is a URL including the authorization code in the query string.
Rather than copying code from initiateAuthleteAuthorization() to processAuthleteAuthorization(), we can factor the common code out. Paste this static method into OAuthUtils:
    public static Map<String, Object> handleAuthleteApiCall(ServletContext context, HttpServletResponse response,
                                                            String api, Map<String, Object> requestMap) throws IOException {
        logger.debug("Calling API {} with params {}", api, OAuthUtils.prettyPrint(requestMap));

        Map<String, Object> responseMap = getClient(context).target(AUTHLETE_BASE + api)
                .request()
                .post(Entity.entity(requestMap, MediaType.APPLICATION_JSON_TYPE), new GenericType<>() {
                });

        logger.debug("Received API response {}", OAuthUtils.prettyPrint(responseMap));

        String action = (String)responseMap.get("action");
        String responseContent = (String)responseMap.get("responseContent");

        switch (action) {
            case "INTERNAL_SERVER_ERROR":
                setResponseBody(response, HttpServletResponse.SC_INTERNAL_SERVER_ERROR, responseContent);
                return null;
            case "BAD_REQUEST":
                setResponseBody(response, HttpServletResponse.SC_BAD_REQUEST, responseContent);
                return null;
            case "LOCATION":
                response.setStatus(HttpServletResponse.SC_FOUND);
                response.setHeader("Location", responseContent);
                response.setHeader("Cache-Control", "no-store");
                response.setHeader("Pragma", "no-cache");
                return null;
        }

        return responseMap;
    }
As you can see, this method includes the error handling from initiateAuthleteAuthorization() and adds handling for the LOCATION action. Add the following static variables at the top of OAuthUtils:
    private static final String AUTHLETE_BASE = "https://api.authlete.com/api";
    private static final Logger logger = LogManager.getLogger();
Now return to OAuthAuthorizationServlet, and replace initiateAuthleteAuthorization() with this code:
    private void initiateAuthleteAuthorization(HttpServletRequest request, HttpServletResponse response) throws IOException {
        // 1. Call the Authlete Authorization endpoint, wrapping the incoming query string in a JSON object
        Map<String, Object> authApiResponse = OAuthUtils.handleAuthleteApiCall(
                getServletContext(), response, "/auth/authorization",
                Collections.singletonMap("parameters", request.getQueryString()));

        // 2. handleAuthleteApiCall() returns null if it already returned a response to the client
        if (authApiResponse == null) {
            return;
        }

        // 3. Perform the action
        String action = (String)authApiResponse.get("action");
        if (action.equals("INTERACTION")) {
            List<Object> prompts = (List<Object>) authApiResponse.get("prompts");
            for (Object prompt : prompts) {
                if (prompt.equals("LOGIN")) {
                    request.getSession().setAttribute("authApiResponse", authApiResponse);
                    LoginUtils.redirectForLogin(request, response);
                    return;
                }
            }
        }

        // 4. We should never get here!
        Map<String, String> errorResponse = Map.of(
                "error", "unexpected_error",
                "error_description", "Contact the service owner for details"
        );
        OAuthUtils.setResponseBody(response, HttpServletResponse.SC_INTERNAL_SERVER_ERROR, mapper.writeValueAsString(errorResponse));
    }
As you can see, we have factored out much of the ‘boilerplate’ code to OAuthUtils.handleAuthleteApiCall(). The remaining code is focused on the specifics of initiating authorization.
Again, save all your changes, run the rebuild script to rebuild and redeploy the apps:
docker exec -it authlete-loyalty /run/rebuild.sh
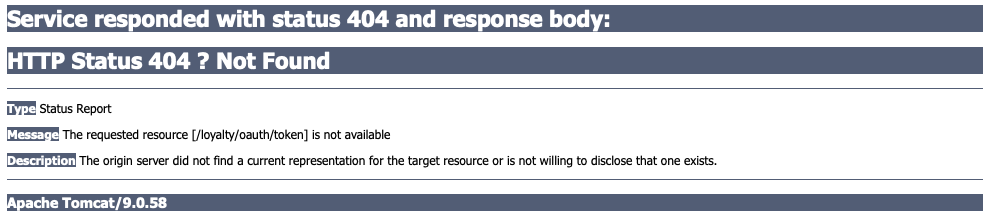
Browse to http://localhost:8080/ecommerce and start the flow by clicking ‘Link my Loyalty Account’. Log in, and you’ll see that the client is trying to send a request to the loyalty program’s OAuth token endpoint, but it does not yet exist:
Now we’ll add a second servlet to the loyalty program website that will exchange the client’s authorization code for an access token.
If you run into any issues, you can discard your changes so that the source is at the end of step 1, or checkout the source as it should be at the end of step 2.
To discard your changes:
git restore .
To discard your changes and skip to the end of step 2:
git restore .
git checkout step-2
The authorization servlet’s work is done; now it’s time to create a servlet to handle the token request. Create a new Java source file, OAuthTokenServlet.java, in the same directory as OAuthAuthorizationServlet.java.
package com.authlete.simpleauth.oauth;

import com.fasterxml.jackson.databind.ObjectMapper;

import javax.servlet.annotation.WebServlet;
import javax.servlet.http.HttpServlet;
import javax.servlet.http.HttpServletRequest;
import javax.servlet.http.HttpServletResponse;
import java.io.IOException;
import java.nio.charset.StandardCharsets;
import java.util.Collections;
import java.util.Map;

@WebServlet("/oauth/token")
public class OAuthTokenServlet extends HttpServlet {
    private static final long serialVersionUID = 1L;
    private final ObjectMapper mapper = new ObjectMapper();

    @Override
    protected void doPost(HttpServletRequest request, HttpServletResponse response) throws IOException {
        // 1. Call the /auth/token endpoint, passing the request body
        String body = new String(request.getInputStream().readAllBytes(), StandardCharsets.UTF_8);
        Map<String, Object> authApiResponse =
                OAuthUtils.handleAuthleteApiCall(getServletContext(), response, "/auth/token",
                        Collections.singletonMap("parameters", body));

        // 2. handleAuthleteApiCall() returns null if it already returned a response to the client
        if (authApiResponse == null) {
            return;
        }

        // 3. Perform the action
        String action = (String)authApiResponse.get("action");
        if (action.equals("OK")) {
            String responseContent = (String)authApiResponse.get("responseContent");
            OAuthUtils.setResponseBody(response, HttpServletResponse.SC_OK, responseContent);
            return;
        }

        // 4. We should never get here!
        Map<String, String> errorResponse = Map.of(
                "error", "unexpected_error",
                "error_description", "Contact the service owner for details"
        );
        OAuthUtils.setResponseBody(response, HttpServletResponse.SC_INTERNAL_SERVER_ERROR, mapper.writeValueAsString(errorResponse));
    }
}
This servlet is very similar to the initiateAuthleteAuthorization() method in the authorization servlet. In fact, the only real differences are:
/auth/token rather than /auth/authorizationOK action, rather than INTERACTION, by relaying responseContent back to the client with a 200 OK HTTP statusLooking at the documentation for the Authlete API Token Endpoint, we can see that /auth/token is expecting the request body, and will return a response with action set to either OK or one of three error values. We’ve seen two of the error codes before, but there’s a new one, INVALID_CLIENT. It’s straightforward to extend handleAuthleteApiCall in OAuthUtils.java to handle INVALID_CLIENT.
Replace the switch statement with this code:
        switch (action) {
            case "INTERNAL_SERVER_ERROR":
                setResponseBody(response, HttpServletResponse.SC_INTERNAL_SERVER_ERROR, responseContent);
                return null;
            case "BAD_REQUEST":
            case "INVALID_CLIENT":
                setResponseBody(response, HttpServletResponse.SC_BAD_REQUEST, responseContent);
                return null;
            case "LOCATION":
                response.setStatus(HttpServletResponse.SC_FOUND);
                response.setHeader("Location", responseContent);
                response.setHeader("Cache-Control", "no-store");
                response.setHeader("Pragma", "no-cache");
                return null;
        }
As you can see, we handle INVALID_CLIENT in exactly the same way as BAD_REQUEST.
Run the rebuild script to rebuild and redeploy the apps:
docker exec -it authlete-loyalty /run/rebuild.sh
As before, browse to http://localhost:8080/ecommerce and start the flow by clicking ‘Link my Loyalty Account’. Log in, and, this time, you’ll see an error like this:
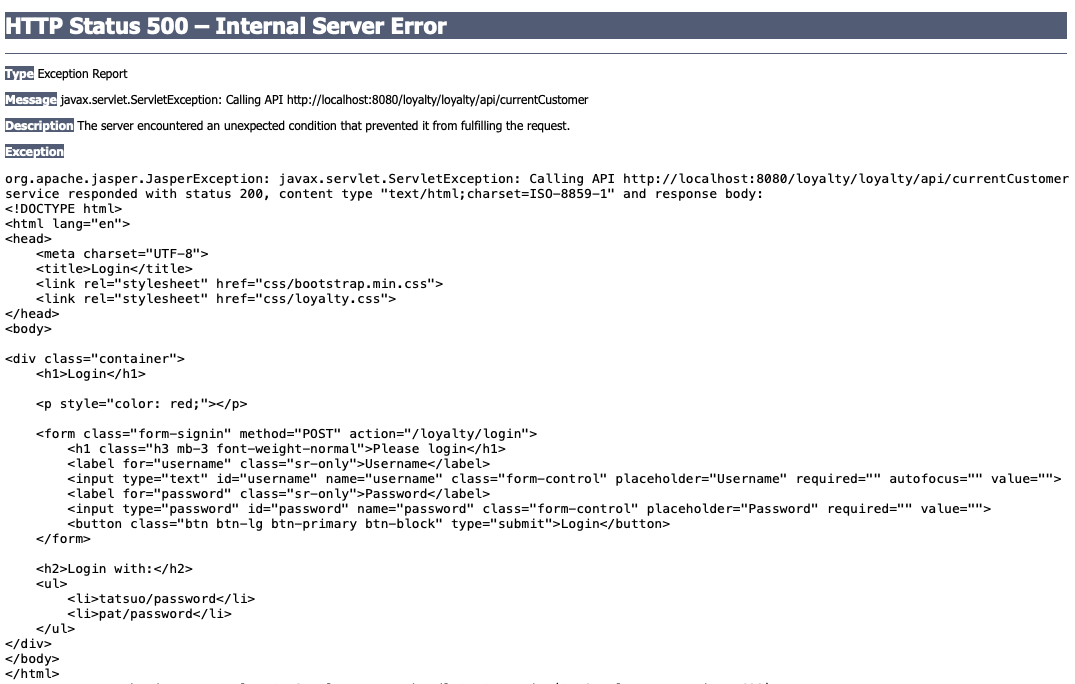
We implemented step 3 of the OAuth flow, so the client has an access token. Now the client is trying to call the loyalty program REST API endpoint http://authlete-loyalty:8080/loyalty/api/currentCustomer with that access token, but is receiving the HTML for the login page rather than the expected JSON response.
We must complete one final step to allow the e-commerce app to retrieve the end user’s loyalty program data.
If you run into any issues, you can discard your changes so that the source is at the end of step 2, or checkout the source as it should be at the end of step 3.
To discard your changes:
git restore .
To discard your changes and skip to the end of step 3:
git restore .
git checkout step-3
The loyalty authorization server has successfully authorized the e-commerce app, issuing it an access token. Our last task is to extend the current loyalty program API to recognize the OAuth Authorization header on incoming API calls, implementing step 4 of the OAuth flow.
The existing loyalty program code implements a servlet filter to redirect the user to login when they try any URLs that are not public. Here is the code:
  @Override
  public void doFilter(ServletRequest req, ServletResponse resp, FilterChain chain) throws IOException,
      ServletException {
    HttpServletRequest request = (HttpServletRequest) req;
    HttpServletResponse response = (HttpServletResponse) resp;

    logger.info("Requested {} to {}", request.getMethod(), request.getRequestURL());

    // 1. If the request is for a public page, we can allow it to proceed
    if (LoginUtils.isPublicPage(request)) {
      logger.info("Allowing request for public page");
      chain.doFilter(request, response);
      return;
    }

    // 2. Try to retrieve user information from the HTTP session
    HttpSession session = request.getSession();
    UserAccount authenticatedUser = LoginUtils.getAuthenticatedUser(session);

    // 3. If there is an authenticated user we attach their username to the request and allow it to proceed
    if (authenticatedUser != null) {
      logger.info("Allowing request for authenticated user");
      chain.doFilter(new UserRequestWrapper(authenticatedUser.getUsername(), request), response);
      return;
    }

    // 4. There is no authenticated user - redirect for login
    logger.info("Redirecting for login");
    LoginUtils.redirectForLogin(request, response);
  }
It’s straightforward to follow the logic:
If the requested page is ‘public’, we can allow the request to proceed. Only the login page, front page, CSS files, and OAuth servlets are public. All other URLs require the user to authenticate.
When the user authenticates, the login servlet attaches an account object to the HTTP session. The filter attempts to retrieve the authenticated user’s account from the session.
If there is an account, then the filter attaches the authenticated user’s username to the request as the user principal and allows it to proceed.
Otherwise, the filter responds with a redirect to the login page.
API calls from the e-commerce website will include an Authorization header containing an access token. We can implement a new filter that runs before the existing login filter to validate the access token and attach the user’s account object to the HTTP session so that the login filter will allow the request to proceed.
Create another Java source file, OAuthFilter.java, in the com.authlete.simpleauth.oauth package with the following content:
package com.authlete.simpleauth.oauth;

import com.authlete.simpleauth.UserRequestWrapper;
import com.fasterxml.jackson.databind.ObjectMapper;
import org.apache.logging.log4j.LogManager;
import org.apache.logging.log4j.Logger;

import javax.servlet.*;
import javax.servlet.annotation.WebFilter;
import javax.servlet.http.HttpServletRequest;
import javax.servlet.http.HttpServletResponse;
import java.io.IOException;
import java.util.Collections;
import java.util.Map;

@WebFilter(filterName="oauthFilter")
public class OAuthFilter implements Filter  {
    private static final String BEARER_SPACE = "Bearer ";
    private static final Logger logger = LogManager.getLogger();
    private final ObjectMapper mapper = new ObjectMapper();

    @Override
    public void init(FilterConfig filterConfig) throws ServletException {
    }

    @Override
    public void doFilter(ServletRequest req, ServletResponse resp, FilterChain chain) throws IOException, ServletException {
        HttpServletRequest request = (HttpServletRequest)req;
        HttpServletResponse response = (HttpServletResponse)resp;

        // 1. Is there an Authorization header with an access token?
        String authHeader = request.getHeader("Authorization");
        if (authHeader == null || !authHeader.startsWith(BEARER_SPACE)) {
            chain.doFilter(request, response);
            return;
        }

        // 2. Extract the bearer token from the header value and send it to the introspection endpoint.
        String token = authHeader.substring(BEARER_SPACE.length());
        logger.info("Found access token {} - validating it with Authlete", token);
        Map<String, Object> authApiResponse = OAuthUtils.handleAuthleteApiCall(req.getServletContext(), response,
                "/auth/introspection", Collections.singletonMap("token", token));

        if (authApiResponse == null) {
            // 3. There was an error calling the Authlete API. OAuthUtils.handleAuthleteApiCall has handled it.
            // Nothing more to do here.
            logger.error("Disallowing API request with access token {}", token);
            return;
        }

        // 4. Attach the username to the request and pass the request down the chain
        String action = (String)authApiResponse.get("action");
        if (action.equals("OK")) {
            String username = (String) authApiResponse.get("subject");
            logger.info("Allowing API request to {} for user {}", request.getRequestURI() , username);
            chain.doFilter(new UserRequestWrapper(username, request), response);
            return;
        }

        // 5. We should never get here!
        Map<String, String> errorResponse = Map.of(
                "error", "unexpected_error",
                "error_description", "Contact the service owner for details"
        );
        OAuthUtils.setResponseBody(response, HttpServletResponse.SC_INTERNAL_SERVER_ERROR, mapper.writeValueAsString(errorResponse));
    }

    @Override
    public void destroy() {
    }
}
The filter’s logic is straightforward:
The filter looks for an Authorization HTTP header with a value that starts with "Bearer " (note the space). If there isn’t such a header, then there’s nothing more to do here, and the request can pass on down the filter chain.
The filter extracts the access token from the HTTP header and sends it to the Authlete API’s Introspection endpoint for validation. At this point, a real-world client would likely cache the introspection response to improve performance on subsequent API calls.
If the action returned by Authlete indicates an error then OAuthUtils.handleAuthleteApiCall() will have already taken the appropriate action, so we can simply log the fact that we are disallowing access and return at this point.
The response from the API includes the authenticated user’s username in the subject property. We can attach it to the request, and pass the request down the chain.
If we reach this point, it means that the action was not handled. This should never happen!
In this simple first-party demo, we are not using OAuth scopes. A Resource Server validating API calls from a third-party OAuth client would receive a list of scopes associated with the token in the introspection response. The Resource Server would then verify that the HTTP method and URL were permitted by a scope associated with the token.
Looking at the introspection endpoint’s documentation, we can see that, if the token is valid, the action will be OK, and the response will contain a subject property identifying the end user. There are also additional possible error values: UNAUTHORIZED and FORBIDDEN.
UNAUTHORIZED means that the access token was not recognized or has expired; FORBIDDEN means that the access token does not cover the required scopes or that the subject associated with the access token is different from the subject contained in the request. Neither of the FORBIDDEN situations can occur in this simple demo, but we include the error handling for completeness.
Both of these errors require the service to return the contents of responseContent to the client in the WWW-Authenticate HTTP header.
We need to add more error handling to OAuthUtils.handleAuthleteApiCall(). Replace the switch statement with this code:
        switch (action) {
            case "INTERNAL_SERVER_ERROR":
                setResponseBody(response, HttpServletResponse.SC_INTERNAL_SERVER_ERROR, responseContent);
                return null;
            case "BAD_REQUEST":
            case "INVALID_CLIENT":
                setResponseBody(response, HttpServletResponse.SC_BAD_REQUEST, responseContent);
                return null;
            case "UNAUTHORIZED":
                setAuthenticateHeader(response, HttpServletResponse.SC_UNAUTHORIZED, responseContent);
                return null;
            case "FORBIDDEN":
                setAuthenticateHeader(response, HttpServletResponse.SC_FORBIDDEN, responseContent);
                return null;
            case "LOCATION":
                response.setStatus(HttpServletResponse.SC_FOUND);
                response.setHeader("Location", responseContent);
                response.setHeader("Cache-Control", "no-store");
                response.setHeader("Pragma", "no-cache");
                return null;
            default:
                break;
        }
Also, add the new utility function referenced above:
    private static void setAuthenticateHeader(HttpServletResponse response, int statusCode, String responseContent) {
        response.setStatus(statusCode);
        response.setHeader("WWW-Authenticate", responseContent);
        response.setHeader("Cache-Control", "no-store");
        response.setHeader("Pragma", "no-cache");
    }
The new OAuth filter sets the username in the HTTP request. We need to modify the existing login filter to allow those requests. Open $SOURCE_ROOT/loyalty/src/main/java/com/authlete/simpleauth/LoginFilter.java and add the following code between steps 1 and 2:
    // 1.5 Is there already a username attached to the request?
    Principal principal = request.getUserPrincipal();
    if (principal != null) {
      String username = principal.getName();
      if (username != null) {
        logger.info("Allowing request for user principal {}", username);
        chain.doFilter(request, response);
        return;
      }
    }
The final task is to ensure that, for API requests, the OAuth filter is called before the login filter. In $SOURCE_ROOT/loyalty/src/main/webapp/WEB-INF/web.xml, insert this filter mapping before the mapping for the login filter:
  <filter-mapping>
    <filter-name>oauthFilter</filter-name>
    <url-pattern>/api/*</url-pattern>
  </filter-mapping>
Note that url-pattern is relative to the loyalty web application’s context root, /loyalty.
As before, run the rebuild script to rebuild and redeploy the apps:
docker exec -it authlete-loyalty /run/rebuild.sh
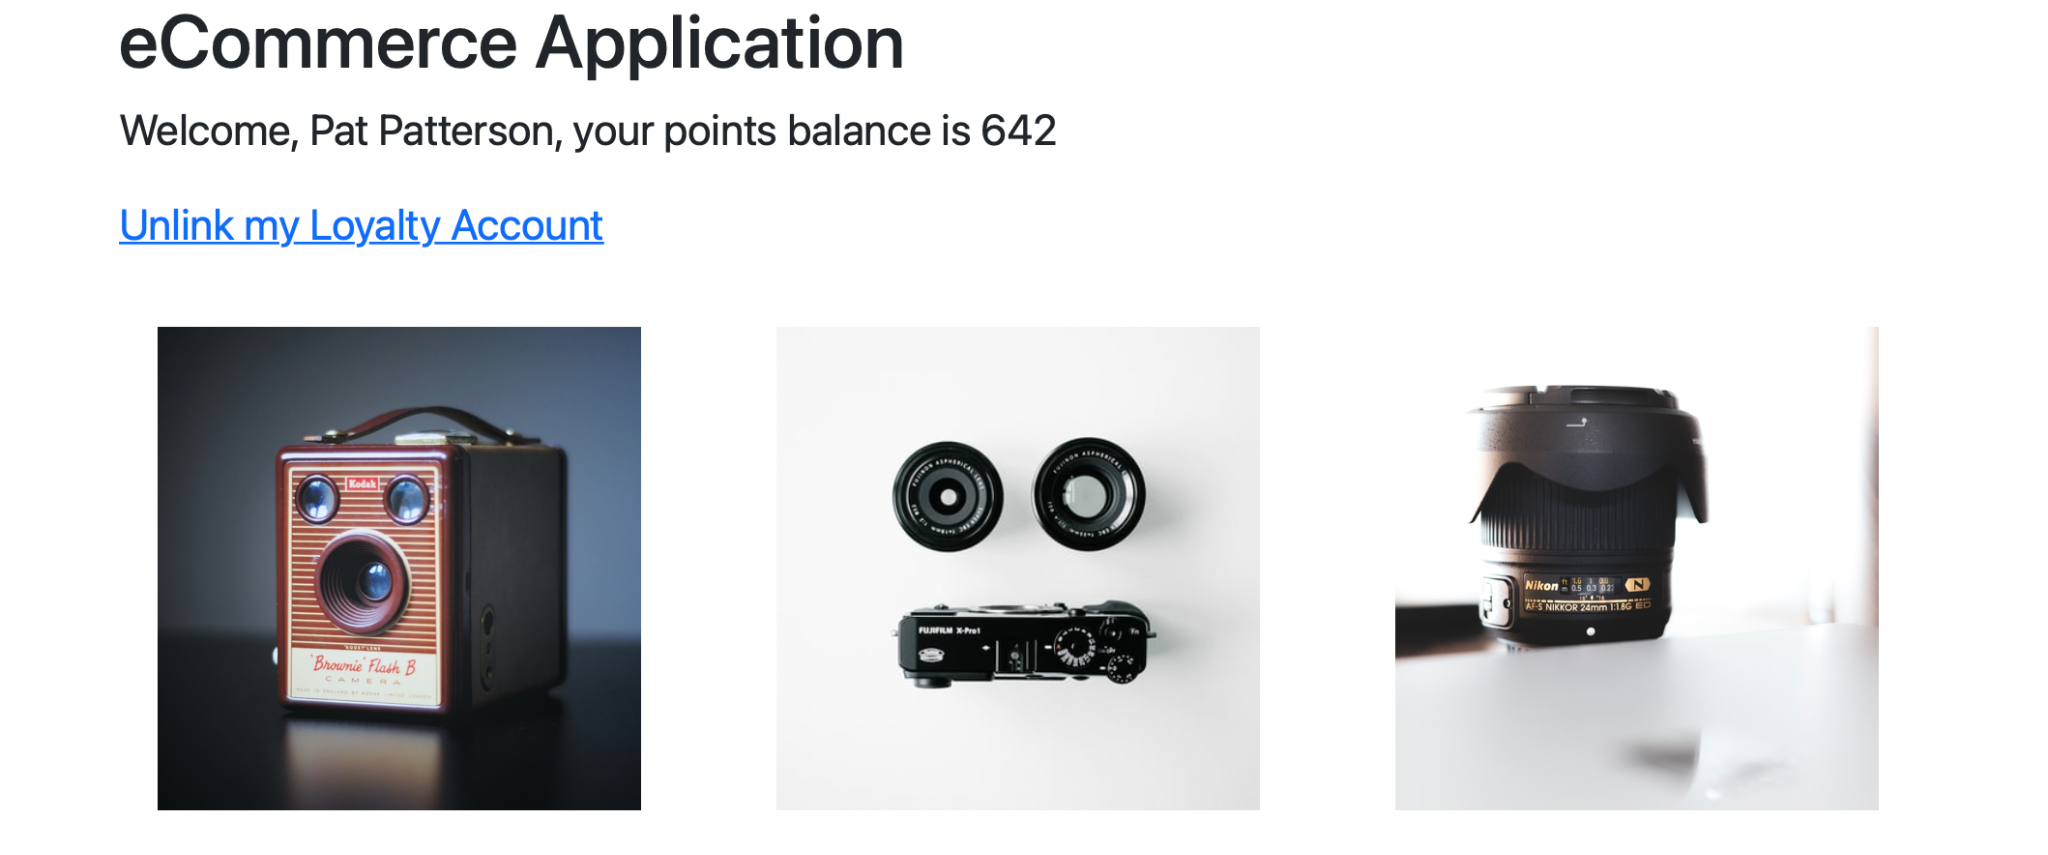
One last time, browse to http://localhost:8080/ecommerce. You will immediately see the user’s name and loyalty account points balance:
You might be asking “Why wasn’t I prompted to login this time?”
When you logged in at the end of step 3, the e-commerce application received an access token and stored it in the HTTP session. When the browser retrieved the e-commerce app’s front page just now, that session was still active, so the ecommerce app used the access token to call the API, just as it did in step 3. This time, the loyalty app was able to validate the access token with Authlete and retrieve the username, so the API call succeeds.
Click Unlink my Loyalty Account, then click to link it again, and verify that you are prompted to login, as expected. Again, you will see the user’s name and loyalty account points balance.
Success – you’ve completed the OAuth proof-of-concept in record time!
If you’re done with the Docker container for now, you can stop it:
docker stop authlete-loyalty
To start the container again:
docker start authlete-loyalty
To remove the container altogether:
docker rm authlete-loyalty
If you run into any issues, you can discard your changes so that the source is at the end of step 3, or checkout the source as it should be at the end of step 4.
To discard your changes:
git restore .
To discard your changes and skip to the end of step 4:
git restore .
git checkout step-4
You added very little code to the loyalty program web application to enable it as an OAuth 2.0 authorization server and resource server, and most of that code was simply passing the client’s requests to the Authlete API and relaying the API’s responses back to the client.
Here’s the OAuth 2.0 flow in full again:
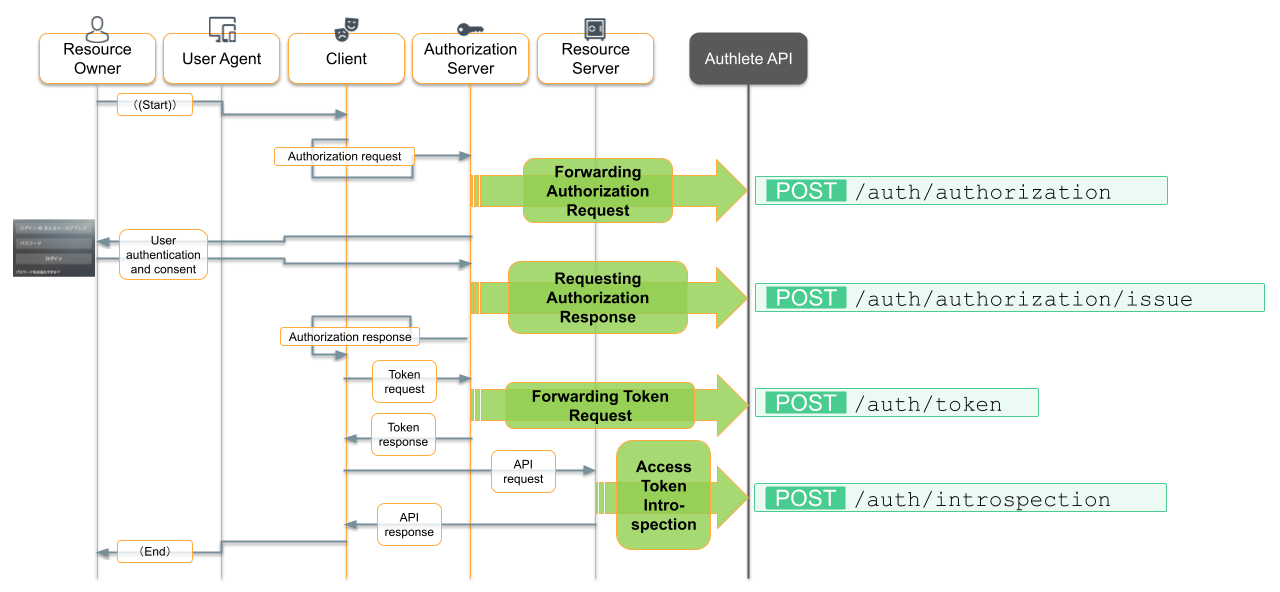
Let’s review what Authlete is doing in each step of the flow:
In this initial step, the user clicks the link at the ecommerce site, which responds with an authorization request in the form of a redirect to the authorization server with a URL such as:
http://localhost:8081/loyalty/oauth/authorization?
response_type=code&
client_id=01234567890123&
redirect_uri=http://localhost:8080/ecommerce/oauth&
state=Loyalty&
prompt=login
(Line breaks added for clarity)
The loyalty app’s OAuth authorization servlet forwards the query string (everything after the ‘?’) to the Authlete /auth/authorization endpoint. Note that the servlet need not parse the query string or, indeed, have any knowledge of the OAuth parameters.
Authlete’s response includes a ticket value uniquely identifying this series of message exchanges, the action that the servlet should take - INTERACTION, and the form that the action should take - LOGIN.
The response indicates that the servlet’s responsibility is to authenticate the user and move on to the next step.
Now the servlet calls on Authlete to issue an authorization code. The servlet must ensure at this step that the user is indeed logged in.
If, for some reason, the servlet finds itself at this step and the user has not been authenticated, then the servlet calls Authlete’s /auth/authorization/fail endpoint with a reason of NOT_LOGGED_IN. In this case, Authlete will respond with an action of LOCATION and a URL containing the client’s redirect URL and error parameters indicating that the client requested that the user be logged in, but this did not take place.
If all is well, on the other hand, the servlet sends a request including the ticket issued in step 1 and the user’s username to Authlete’s /auth/authorization/issue endpoint. Authlete’s response again contains an action, in this case, LOCATION, instructing the servlet to return HTTP status 302 Found to the client, redirecting it to the location held in responseContent, a URL including the authorization code in the query string.
Again, notice that servlet is not concerned with the details of the OAuth protocol. It is simply an intermediary between the client and Authlete, acting according to each API response.
In step 3, the client directly POSTs the authorization code it obtained via the redirect in the previous step to the OAuth token servlet.
The token servlet simply sends the entire, unparsed, body of the request to the Authlete /auth/token endpoint. Again, the servlet need not have any knowledge of the content of the request, in this case, a form post containing an OAuth access token request, for example:
grant_type=authorization_code&
code=some_random_string_of_characters&
client_id=01234567890123&
client_secret=shared_secret_between_the_client_and_authorization_server&
redirect_uri=http%3A%2F%2Flocalhost%3A8080%2Fecommerce%2Foauth
(Line breaks added for clarity)
The token servlet acts on the response from the Authlete API, just as the authorization servlet did, in this case, returning a JSON payload to the client:
{
  "access_token": "another_random_string_of_characters",
  "scope": null,
  "token_type": "Bearer",
  "expires_in": 86400
}
(JSON formatted for clarity)
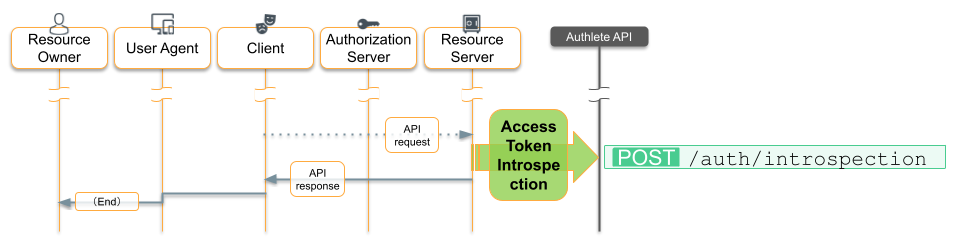
In this final step, we turn our attention to the OAuth servlet filter. This filter is configured to intercept all requests to the loyalty API endpoints. The filter extracts the access token from the incoming request and sends it to the Authlete /auth/introspection endpoint. Authlete validates the token and, if it is valid, returns a response with an action of OK and subject set to the user’s username. The filter then attaches the username to the request and passes it down the chain.
Again, if an error occurs, Authlete sets the appropriate action and responseContent and the loyalty app responds appropriately.
When the request reaches the login filter, it can allow the request to proceed based on the fact that the username is present. The loyalty API can return the relevant data based on the username in the request.
In about an hour, you took the existing loyalty program web application and, step-by-step, added OAuth Authorization Server and Resource Server capabilities. You didn’t have to parse any input from the OAuth client, the ecommerce website; neither did you have to implement any OAuth protocol or assemble any responses to the client.
By simply adding code to hand incoming OAuth requests to the Authlete API and act on the API’s responses, you OAuth-enabled the loyalty program web app, and completed the proof-of-concept in record time!

